
When you are planning your holiday menu, you need showstoppers, right? Something that screams Christmas the moment it hits the table. I’ve got the answer, and it’s better than anything I’ve made from a store pamphlet. Trust me, this stunning, nostalgic christmas tree cheesecake is going to be the star of your dessert spread, especially since we kick that creamy filling up a notch by folding in crumbled Little Debbie Christmas Tree Cakes. As someone who understands how tricky—and time-consuming—holiday baking can be, I developed this recipe to look incredible without stressing your busy schedule. You finally get that ‘wow’ factor you crave, thanks to smart techniques honed over years of balancing nutrition advice with real-life demands. If you want to know more about how we prioritize delicious, practical food here at MayaPlate, check out my story on the About Us page.
- Why This Christmas Tree Cheesecake Recipe Is Your New Holiday Favorite
- Gathering Ingredients for Your Christmas Tree Cheesecake Recipe
- Step-by-Step Instructions for the Baked Christmas Tree Cheesecake
- Tips for an Easy Christmas Cheesecake Success
- Variations on the Christmas Tree Cheesecake
- Serving Suggestions for Your Winter Cheesecake Recipe
- Storage and Reheating Instructions for this Christmas Tree Cheesecake
- Frequently Asked Questions About Making a Christmas Tree Cheesecake
- Nutritional Snapshot of Your Holiday Cheesecake Dessert
- Share Your Christmas Baking Ideas
- Nutritional Snapshot of Your Holiday Cheesecake Dessert
- Share Your Christmas Baking Ideas
Why This Christmas Tree Cheesecake Recipe Is Your New Holiday Favorite
I get it; sometimes the holidays make you feel like you need to pull off bakery magic just to keep up! But this cheesecake is different. It’s designed to give you huge results with surprisingly little fuss. It’s the ultimate Showstopper Holiday Dessert because it looks like you spent hours fussing over piping details, but honestly, the decorating is intuitive. That means less kitchen stress and more time actually enjoying your guests!
Achieving the Showstopper Holiday Dessert Look
We rely on texture and decoration here, not complicated pan shapes. By piping simple swirls of green whipped cream on top of that rich, chilled surface, you instantly create that tree shape. It transforms immediately into a genuine Christmas centerpiece dessert. It’s so festive and beautiful; people will assume you’re a dessert genius. It really makes your table shine without needing any fancy equipment.
Integrating Nostalgia with a Creamy Holiday Cheesecake
What separates this from every other plain cheesecake is the secret ingredient tucked inside—those Little Debbie cakes! They melt down just enough during baking, giving you pockets of nostalgic flavor and extra tenderness. It’s a true Creamy Holiday Cheesecake experience. Every bite is rich, but it has that little sugary, familiar hit that everyone secretly loves. Plus, having something this unique makes it a perfect Party Ready Christmas Dessert.
Gathering Ingredients for Your Christmas Tree Cheesecake Recipe
Okay, let’s get shopping! Before we dive into the actual mixing—which is half the fun—we need the right supplies. Because we are aiming for that wonderfully rich, almost decadent texture, ingredient quality matters a little bit here. You really want everything softened properly, especially the cream cheese, or you’ll end up with lumps that ruin that silky finish. Don’t worry, I’ve broken down exactly what you need for this showstopper, including the star ingredient that makes this whole concept work!
Crust Components
We are building a base that’s sturdy enough to hold all that creamy goodness. This part is quick, but it needs a good press down so it doesn’t crumble when you slice it later. For this recipe, you’ll need:
- 180 g graham cracker crumbs
- 85 g unsalted butter, melted
Velvety Cheesecake Filling Ingredients
This is where the magic happens! The combination of smooth filling and those nostalgic chunks makes for a truly Velvety Cheesecake Filling. Make sure your cream cheese is truly soft—I usually leave mine out for a good hour before I even think about mixing.
- 675 g cream cheese, softened
- 100 g granulated sugar
- 2 large eggs
- 1 teaspoon vanilla extract
- 1/4 teaspoon salt
- 10 Little Debbie Christmas Tree Cakes, roughly chopped (plus extra for decoration)
Decoration and Topping Elements for Your Decorated Holiday Cheesecake
This final step turns a delicious cheesecake into the perfect Decorated Holiday Cheesecake centerpiece. Have your sprinkles ready! We want ornaments everywhere!
- 240 ml heavy whipping cream
- 2 tablespoons powdered sugar (for topping)
- Green food coloring (optional, for topping)
- Assorted festive sprinkles
If you need some great tips on integrating dairy into your cooking generally, my guide on cream cheese casseroles has some helpful handling advice!
Step-by-Step Instructions for the Baked Christmas Tree Cheesecake
Now, the fun part! Don’t let the baking part scare you off. Cheesecakes require patience, which is something I’ve learned to work into my day, much like following a good no-knead bread recipe requires patience. We need slow, steady steps to get that perfect, crack-free final product. Watch the timing carefully, especially when it comes out of the heat—that’s the real secret to a gorgeous finish!
Preparing the Buttery Graham Cracker Crust and Prepping the Oven
First things first: turn that oven on! We need it running at 325°F (160°C). Get your 9-inch springform pan ready—grease it well. For the crust, just mix your graham cracker crumbs and melted butter until it looks like wet sand. Press that mixture firmly into the bottom of the pan. We give this a quick 10-minute jump in the hot oven just to set it up nicely. Pop it out and let it cool down while we mix the filling.
Mixing the Creamy Holiday Cheesecake Filling
This is where we avoid texture trouble! Grab your big bowl and beat that softened cream cheese until it’s completely smooth—no lumps allowed! Then, slowly stream in the sugar, mixing until it’s just combined. Next, the eggs go in, and listen closely: add them ONE at a time. Beat just enough to incorporate each egg, and then STOP. Overmixing here whips in too much air, which causes cracking later. Finally, stir in the vanilla and salt, and then gently fold in those chopped-up Little Debbie Christmas Tree Cakes. Don’t wrestle with the batter!
Baking and Cooling the Christmas Tree Cheesecake
Pour that gorgeous filling over your cooled crust. Tap the pan gently on the counter a couple of times to help any big air bubbles escape—that’s a quick trick for a better bake.
Bake it for about 50 to 60 minutes. You’ll know it’s done when the edges look set up solid, but the very center still has that little wiggle when you nudge the pan. Seriously, don’t walk away! The most important baking tip? Once it’s cooked, turn the oven OFF completely. Crack the door open just a tiny bit, and leave the cheesecake inside that warm, gentle environment for a full hour. This slow cool-down prevents dramatic temperature shifts that cause ugly cracks.
After the hour is up, take it out, let it come fully to room temperature on a rack, and then cover it up tight. It needs a long, cold nap in the fridge—minimum 6 hours, but honestly, chilling it overnight gives you the best structure for slicing.
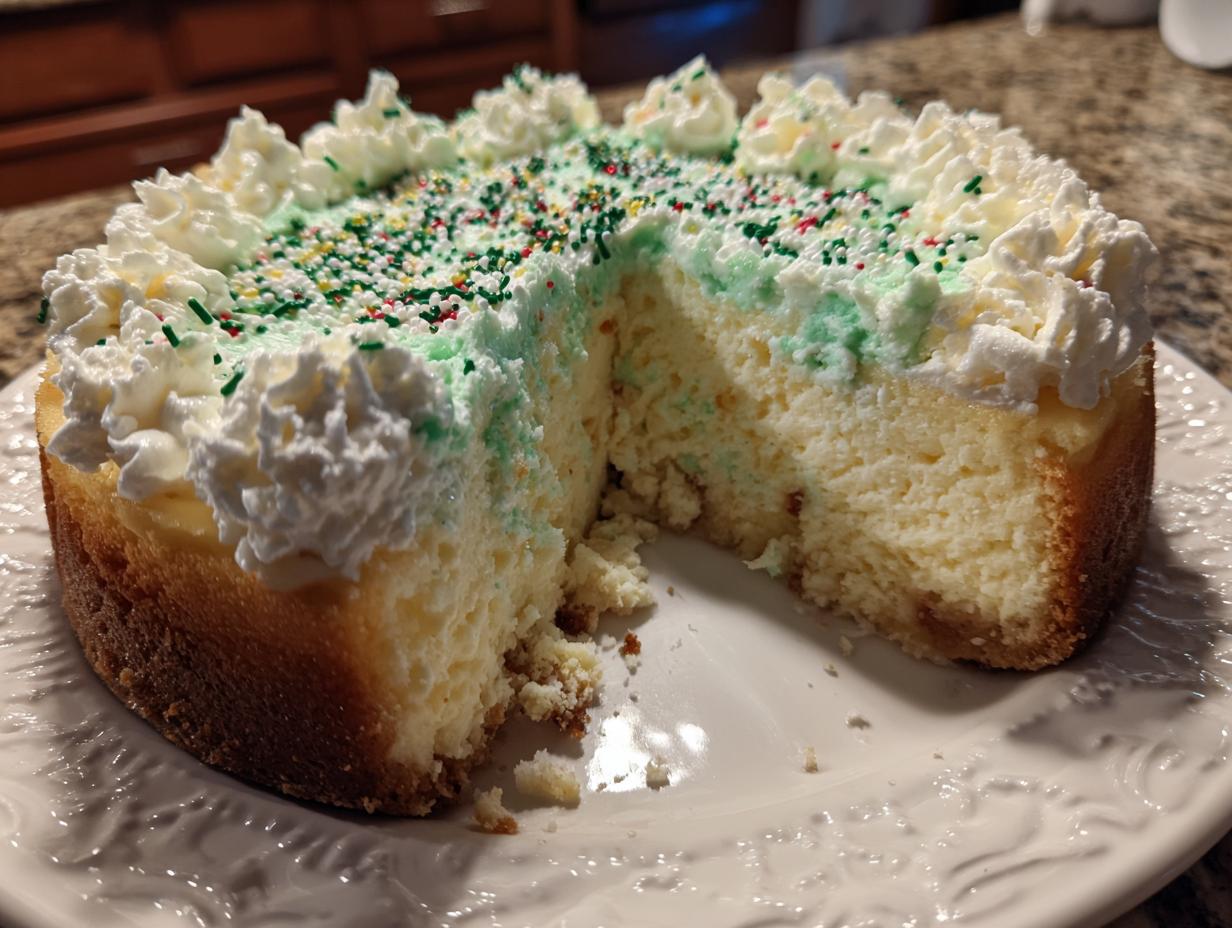
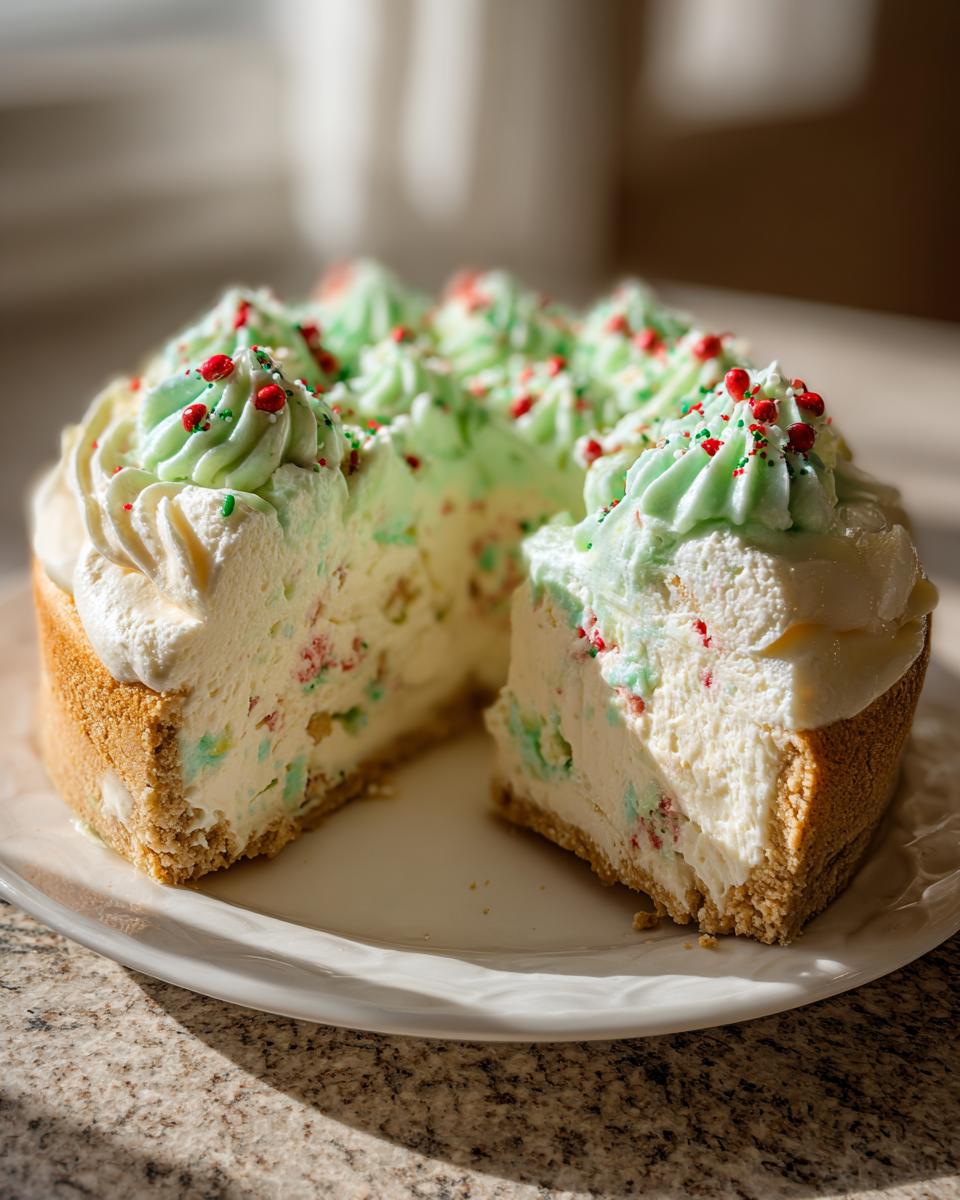
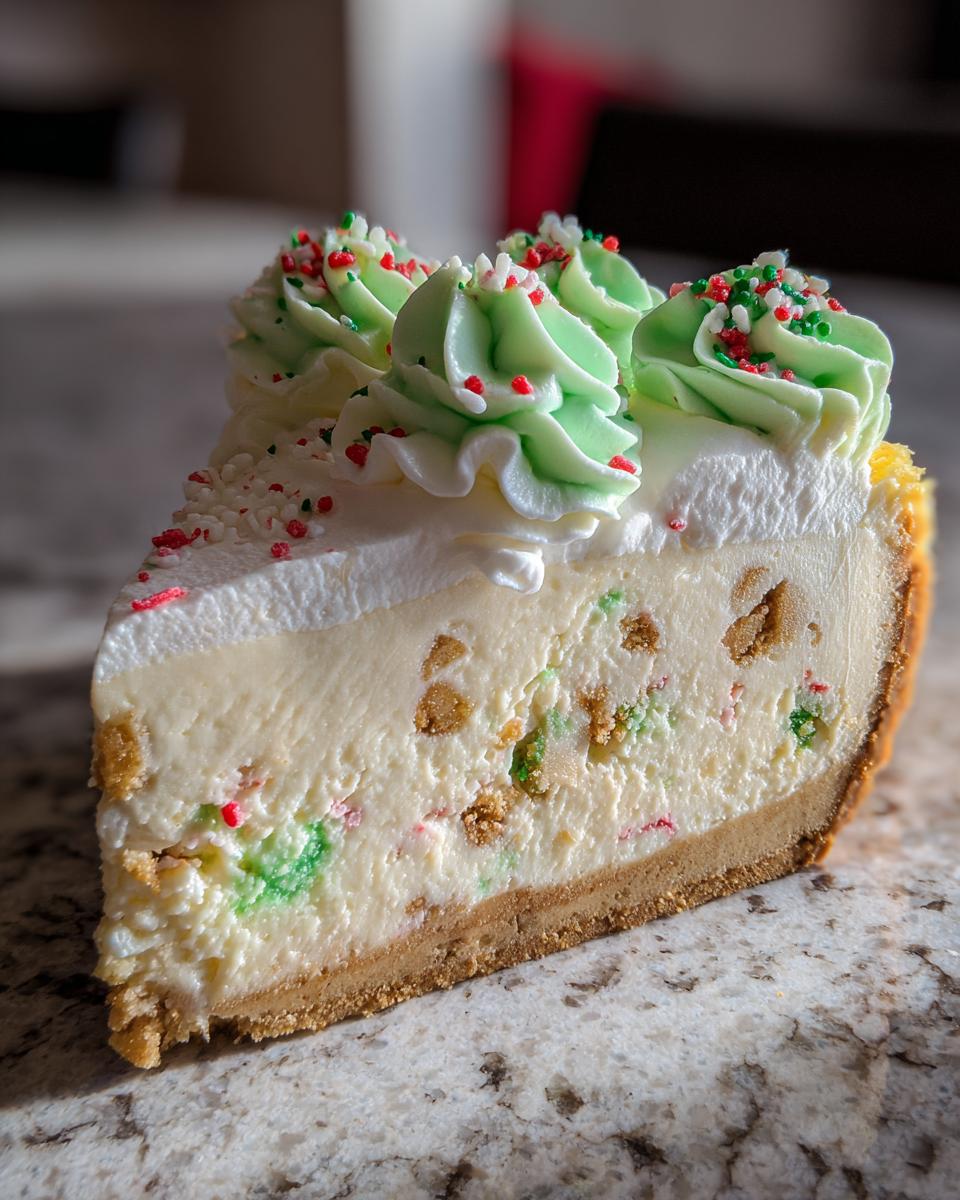
Decorating Your Tree Shaped Dessert
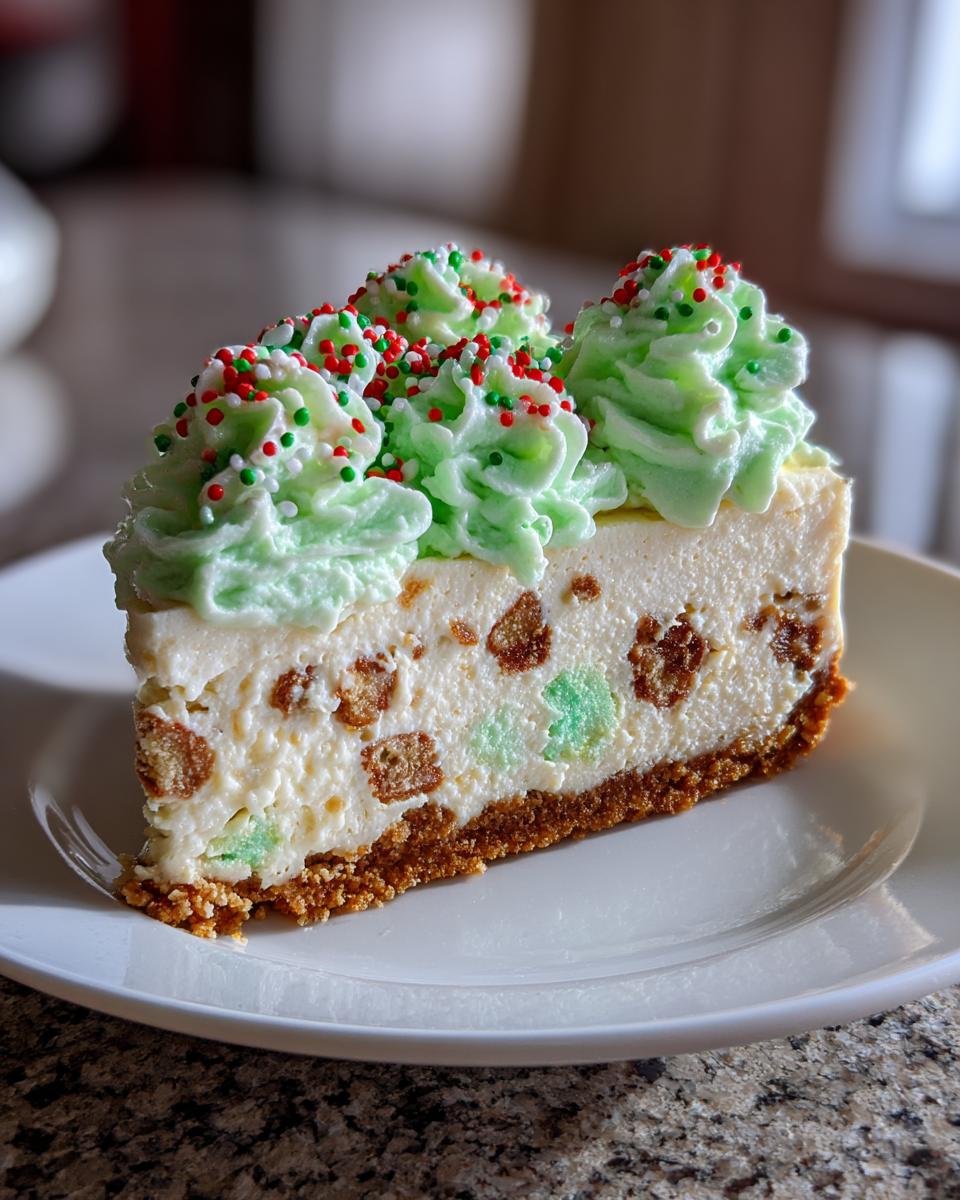
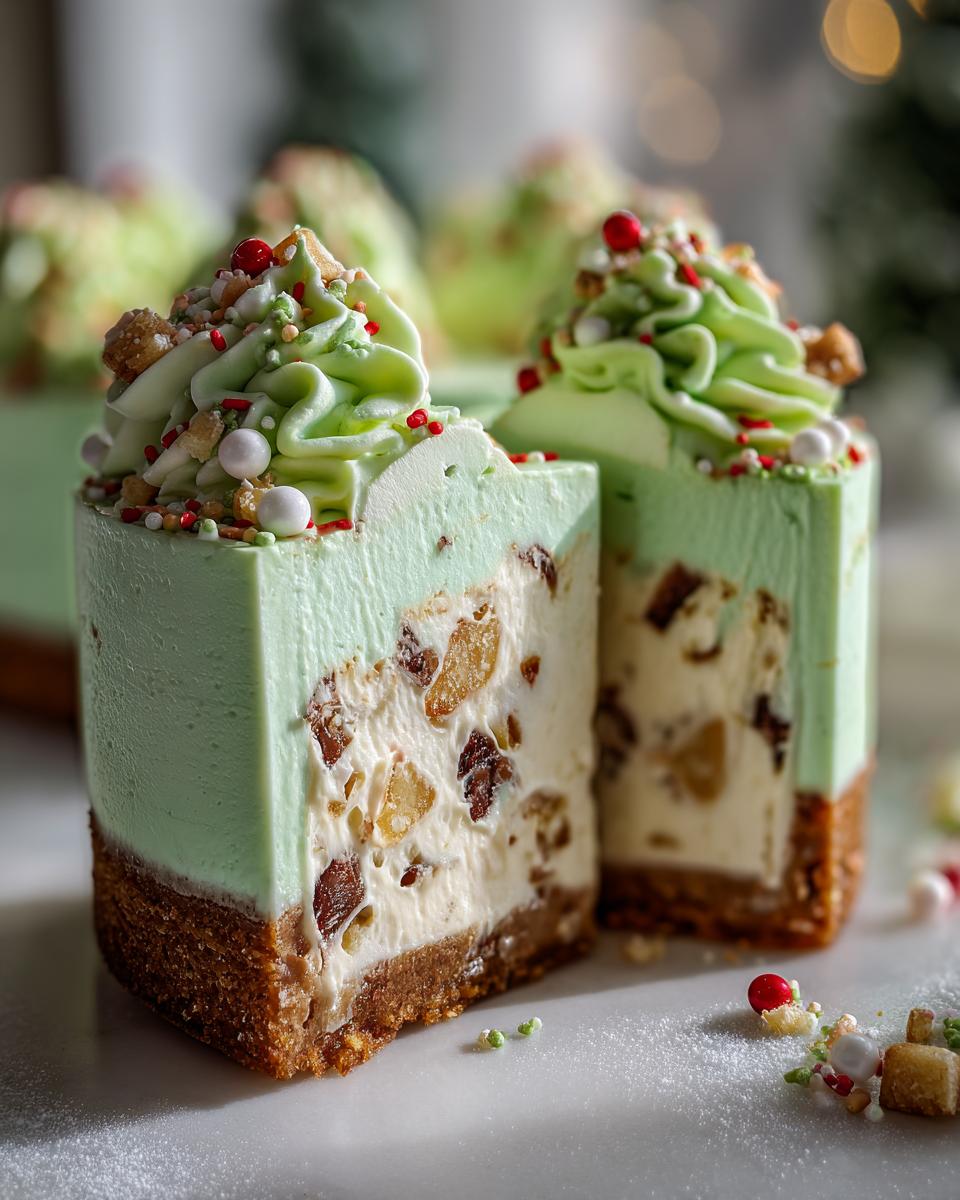
Okay, the main event! Once it’s totally chilled, we create the tree look. Whip your heavy cream with the powdered sugar until you get stiff peaks—that’s when you can hold the whisk upside down and it doesn’t move. If you want that classic green color, add just a drop or two of food coloring and mix gently until you get a soft hue, like a soft winter pine. Use a piping bag or even just a sturdy spoon to spread or pipe that green cream over the top, swirling it to look like branches. Now, scatter those reserved Little Debbie Cakes and your festive sprinkles all over the top like ornaments on your finished christmas tree cheesecake!
Tips for an Easy Christmas Cheesecake Success
Baking a cheesecake that looks this good *and* tastes this rich can feel intimidating, but honestly, it’s all about controlling the environment in your oven. Since this is part of our focus on Simple Holiday Baking, I want to share the tricks that guarantee that silky, smooth texture, even if you’re a beginner. Remember, achieving perfection isn’t about complexity; it’s about technique, which is something I really learned working through my grandmother’s old recipes!
Achieving the Perfect Velvety Cheesecake Filling Texture
If you want that truly luxurious, uncracked surface and a filling so fine it melts on your tongue, you absolutely have to try the water bath, or *bain-marie*. I know it sounds fancy, but it’s just moisture control! Cheesecake filling is mostly eggs and dairy, and extreme dry heat makes it rubbery and causes cracks. To do this, wrap the bottom of your springform pan securely in heavy-duty foil—I usually use two layers just to be safe against seepage. Then, you place that foil-wrapped pan inside a larger roasting pan. When you put it in the oven, you carefully pour about an inch of hot water into the roasting pan. The steam bubbling up keeps the air around your cheesecake moist, ensuring it bakes slowly and evenly throughout. It’s the ticket to an unbelievably creamy result.
Quick Alternatives: No Bake Christmas Tree Cheesecake
Maybe you’re short on oven space, or perhaps you just don’t trust yourself with baking! Good news: we have a fantastic, just-as-delicious variation. For a No Bake Christmas Tree Cheesecake, we skip the eggs entirely—they are what needs that gentle bake to set up. Instead, to keep that wonderful tang and structure, you’ll swap the eggs out and incorporate about half a cup of sour cream into your cream cheese and sugar base. It’s brilliant!
Once you’ve folded in your chopped Little Debbie cakes, you just pour that mixture over your unbaked crust. Then, it goes straight into the fridge. You need patience here, as it sets up cold, not hot. Make sure it chills for a minimum of eight hours, though overnight is always better. The topping and decorating steps stay exactly the same, but you’ve completely bypassed the oven! For more simple make-ahead options, take a look at these sweet potato casserole tips; make-ahead dishes are holiday heroes.
Variations on the Christmas Tree Cheesecake
I love that we’re leaning into the nostalgic aspect of this dessert by using the Little Debbie cakes, but I know our holiday baking adventures don’t always stick to the script. Maybe the store shelves are totally cleaned out of those little trees, or maybe you just want to mix things up for variety this year. That’s totally fine! This recipe is surprisingly adaptable, which is why I love it so much. When we talk about Unique Christmas Treats, personalization is half the fun. You can keep that incredible creamy base and crust but swap out what you fold into the filling.
Little Debbie Inspired Cheesecake Flavor Swaps
If you can’t find the holiday-specific cakes, don’t panic! You can absolutely create a different kind of Little Debbie Inspired Cheesecake experience. My go-to swap when the season changes is crushed peppermint bark. You want to roughly chop it just like you would the cakes, and fold it in right at the end. That gives you fantastic minty crunch throughout the filling.
Another great option, especially if you’re looking for something deeply spiced, is to use crumbled gingerbread cookies or even broken-up store-bought cinnamon rolls (if you use the rolls, maybe skip the extra sugar in the batter so it doesn’t get too sweet). Either way, make sure whatever you add is cold or room temperature so it doesn’t interfere with the batter setting up.
If you want to see another fantastic spiced baking idea that works well in the winter months, check out my recipe for moist pistachio coffee cake—it has that same comforting flavor profile.
Enhancing the Festive Sprinkles Dessert Look
We already talked about using the green whipped cream for the “branches,” but you can take the decorating so much further, especially if you want to amp up the sparkle factor for your Festive Sprinkles Dessert display. Don’t be shy with the edible glitter during those final decorating stages!
Instead of just one shade of green for the whipped cream, you can divide your batch into two bowls. Keep one light, maybe a subtle sage color, and make the second bowl a slightly deeper emerald green. When you pipe them onto the chilled cheesecake, alternating the colors gives you beautiful depth, making the swirls look more defined and branch-like. Also, consider using white sprinkles shaped like tiny stars or snowflakes right before serving for an extra flourish. It really elevates that final presentation!
Serving Suggestions for Your Winter Cheesecake Recipe
Once you’ve pulled this beautiful christmas tree cheesecake out of the fridge, you want to serve it alongside things that let its creamy richness really shine. This dessert is dense, sweet, and full of wonderful nostalgic flavor thanks to those hidden snack cakes. Because it’s such a decadent plateful, we need beverages that can cut through that richness and refresh your palate between bites. Thinking about balance is key to pulling off any great holiday menu, which is why I always plan my drinks right alongside my main dishes!
Pairing Beverages with the Holiday Cheesecake Dessert
When serving this truly memorable Winter Cheesecake Recipe, skip the overly sweet sodas or heavy cocktails. We need something clean and bright. The first thing that comes to mind is really good, strong coffee. I’m talking about a freshly brewed pot of black coffee—that slight bitterness is the perfect foil for the sugar and cream cheese.
If you prefer tea, go for a strong, unflavored brew. Black tea, like an Earl Grey or English Breakfast, served hot or maybe even poured over ice if your party is lively, works wonders. That little bit of astringency washes the palate clean.
For something truly special, especially if you are serving adults, I highly recommend a dry sparkling wine. Think Prosecco or a dry Cava. The bubbles and the acidity are fantastic for dealing with rich desserts. It feels fancy, but it’s so practical for balancing out all that holiday sweetness. When you need a non-alcoholic pairing that isn’t just water, try serving a pitcher of sparkling water infused with just a squeeze of fresh lemon or lime. It’s refreshing and keeps the focus right where it should be—on that stunning dessert! You can find my favorite recipe for one of my go-to comforting pairings, creamy stovetop hot chocolate, if you need something cozy for everyone else to sip on!
Storage and Reheating Instructions for this Christmas Tree Cheesecake
Once you’ve put all that gorgeous effort into decorating, the last thing you want is for your beautiful christmas tree cheesecake to get all sad and dry in the fridge. Luckily, cheesecake is one of the best desserts for making ahead, which is fantastic for holiday entertaining! This recipe, especially with all that cream cheese richness, stays wonderful for several days, provided you cover it up properly when chilling.
The biggest challenge with this one is the topping. Since we are using real whipped cream for those tree branches and fresh Little Debbie cakes as ornaments, storage needs to be handled with a little care. You never want to tightly wrap plastic wrap directly onto whipped cream because it sticks and ruins the piped texture. That’s just a kitchen tragedy waiting to happen!
Here’s my simple, two-step method for keeping this creation looking freshly decorated:
- Initial Chill: Get that cheesecake into the fridge as soon as you finish decorating. You want it to set up firm—at least an hour or two before your party starts.
- Covering Method: Do *not* press plastic wrap onto the surface. Instead, grab toothpicks—the longer ones work best—and stick them at various points around the edges of the cheesecake border, sticking them down into the creamy filling. Then, loosely drape your plastic wrap *over* the toothpicks so it creates a tent over the surface. This keeps the plastic wrap from touching the whipped cream decorations while still protecting the whole thing from fridge odors and drying out.
On a buttery graham cracker crust, this cheesecake lasts beautifully for about 4 to 5 days in the refrigerator when stored this way. Because it’s a cheesecake, you never reheat it! It is meant to be served chilled, straight from the cold. If you are finding that the crust seems a little soft after a few days—which sometimes happens because of the moisture from the filling—you can carefully slide a thin spatula around the bottom edge before cutting. For great ideas on sauces or dips that need to be stored properly, check out my tips over on the garlic aioli recipe page; the coverage advice is similar!
Frequently Asked Questions About Making a Christmas Tree Cheesecake
It’s natural to have a few questions when you’re tackling a big, beautiful dessert like this! I get tons of messages asking about the visuals, timing, and ingredients. Since we want this to be your easiest, most impressive recipe of the season, let’s clear up anything else you might be wondering about before you start prepping your Holiday Cheesecake Dessert.
Can I shape the christmas tree cheesecake without a tree-shaped pan?
Oh yes, absolutely! Don’t worry about hunting down a specialized tree-shaped pan; sometimes those are hard to clean too, right? We intentionally used a standard 9-inch round springform pan for this recipe. Why? Because the actual ‘tree’ shape comes entirely from how you decorate the top surface after the cheesecake is chilled solid. You use the green whipped cream, piping it right over the round surface in layers or swags that mimic the look of a tiered tree. It’s much simpler and lets you control the exact look you’re going for!
How far ahead can I prepare this Festive Cheesecake Ideas dessert?
This is one of the best parts of making a Festive Cheesecake Ideas entry: it’s a make-ahead champion! The cheesecake itself needs that minimum 6-hour chill, but honestly, the structure and flavor of the filling are so much better when it sits overnight. The cream cheese has time to fully meld with the sweetness and the bits of Little Debbie cake taste even richer the next day. You can bake the cheesecake one or even two days before your party, let it cool completely, and keep it covered in the fridge. Just do the final decorative topping—the whipped cream and sprinkles—the day you plan to serve it so the cream stays perfectly fluffy.
Where do I find the Little Debbie Christmas Tree Cakes?
That’s the million-dollar question every December! Since these are seasonal, they don’t appear in stores year-round. Your best bet is usually to check the seasonal end-caps or holiday baking aisles right around Thanksgiving or early November. If your regular grocery store doesn’t carry them, I always suggest checking the larger warehouse clubs or even sometimes local discount stores that bring in seasonal candy stock early. If you really strike out, you could always try substituting with peppermint bark or chocolate chip cookies, but I promise the nostalgic flavor from the actual trees is worth a little bit of searching!
If you have any other questions about timing or technique, feel free to reach out via the Contact Page!
Nutritional Snapshot of Your Holiday Cheesecake Dessert
Because this recipe incorporates snack cakes and a rich, buttery crust, it definitely falls into the category of a truly decadent holiday treat! While this recipe provides flavor and joy above all else, I always like to give you a general idea of the numbers so you know what you’re working with. Please remember that these values are estimates based on standard ingredient measurements and brands used in this specific christmas tree cheesecake recipe, and results can vary slightly based on exact portion sizes and optional decorations used.
- Serving Size: 1 slice
- Calories: 450
- Sugar: 35
- Sodium: 300
- Fat: 30
- Saturated Fat: 18
- Carbohydrates: 40
- Protein: 7
Share Your Christmas Baking Ideas
I absolutely cannot wait to see your finished creations! Pulling off a show-stopper like this is a huge accomplishment, and I love seeing how you decorate them. Whether you stick exactly to my green whipped cream vision or you go wild with edible gold dust and candy canes, snap a picture and share it! Tagging a photo helps spread the holiday cheer.
If you loved how easy and festive this recipe turned out to be, please take a moment to consider giving it a rating below—it really helps other home cooks find reliable holiday baking inspiration. And if you want more practical, incredibly delicious recipes designed for busy lives, make sure you check out all the other dessert recipes we have waiting for you here!
Nutritional Snapshot of Your Holiday Cheesecake Dessert
Because this recipe incorporates snack cakes and a rich, buttery crust, it definitely falls into the category of a truly decadent holiday treat! I always like to give you a general idea of the numbers so you know what you’re working with when you plan your holiday plating. Please remember that these values are estimates based on standard ingredient measurements and brands used in this specific christmas tree cheesecake recipe, and results can vary slightly depending on how generously you apply that whipped cream topping!
- Serving Size: 1 slice
- Calories: 450
- Sugar: 35
- Sodium: 300
- Fat: 30
- Saturated Fat: 18
- Carbohydrates: 40
- Protein: 7
If you want to know more about how we approach food and nutrition here at MayaPlate, take a look over at the About Us page. We always aim for deliciousness first, but knowing the basics helps when planning a balanced holiday celebration!
Share Your Christmas Baking Ideas
I absolutely cannot wait to see your finished creations! Pulling off a show-stopper like this is a huge accomplishment, and I love seeing how you decorate them. Whether you stick exactly to my green whipped cream vision or you go wild with edible gold dust and candy canes, snap a picture and share it! Tagging a photo helps spread the holiday cheer.
If you loved how easy and festive this recipe turned out to be, please take a moment to consider giving it a rating below—it really helps other home cooks find reliable holiday inspiration. And if you want more practical, incredibly delicious recipes designed for busy lives, make sure you check out all the other delicious dessert recipes we have waiting for you here!
PrintShow-Stopping Christmas Tree Cheesecake with Little Debbie Cakes
Create a festive centerpiece dessert using Little Debbie Christmas Tree Cakes for a nostalgic and creamy holiday cheesecake that impresses guests.
- Prep Time: 30 min
- Cook Time: 60 min
- Total Time: 7 hours 30 min
- Yield: 10 servings 1x
- Category: Dessert
- Method: Baking
- Cuisine: American
- Diet: Vegetarian
Ingredients
- 180 g graham cracker crumbs
- 85 g unsalted butter, melted
- 675 g cream cheese, softened
- 100 g granulated sugar
- 2 large eggs
- 1 teaspoon vanilla extract
- 1/4 teaspoon salt
- 10 Little Debbie Christmas Tree Cakes, roughly chopped (plus extra for decoration)
- 240 ml heavy whipping cream
- 2 tablespoons powdered sugar (for topping)
- Green food coloring (optional, for topping)
- Assorted festive sprinkles
Instructions
- Preheat your oven to 325°F (160°C). Lightly grease a 9-inch springform pan.
- Prepare the crust: Combine graham cracker crumbs and melted butter in a bowl. Press the mixture firmly and evenly into the bottom of the prepared springform pan. Bake for 10 minutes. Let cool while you prepare the filling.
- Prepare the filling: In a large bowl, beat the softened cream cheese until smooth. Gradually add the granulated sugar, beating until fully incorporated.
- Beat in the eggs one at a time, mixing just until combined after each addition. Stir in the vanilla extract and salt. Do not overmix the batter.
- Gently fold in the roughly chopped Little Debbie Christmas Tree Cakes into the cream cheese mixture.
- Pour the filling over the cooled crust. Tap the pan gently on the counter to release any large air bubbles.
- Bake for 50 to 60 minutes, or until the edges are set but the center still has a slight jiggle.
- Turn off the oven, crack the door open slightly, and let the cheesecake cool inside the oven for 1 hour. This prevents cracking.
- Remove the cheesecake from the oven and let it cool completely on a wire rack. Once cool, cover and chill in the refrigerator for at least 6 hours, or preferably overnight.
- Prepare the topping: Whip the heavy whipping cream with powdered sugar until stiff peaks form. If desired, add a few drops of green food coloring and mix until you achieve a light green color.
- Decorate the chilled cheesecake to resemble a tree: Pipe or spread the green whipped cream over the top in layers or swirls to mimic tree branches.
- Place whole or halved Little Debbie Christmas Tree Cakes around the edges or on top as ornaments. Scatter festive sprinkles over the surface.
- Slice and serve cold.
Notes
- For a no-bake version, chill the filling for at least 8 hours. Omit the eggs and use 1/2 cup of sour cream for extra tang and stability in the filling.
- If you do not have a springform pan, you can use a standard 9-inch cake pan lined with parchment paper, leaving an overhang for easy removal.
- Use a water bath (bain-marie) during baking for the creamiest texture; wrap the outside of the springform pan securely in heavy-duty foil before placing it in a larger roasting pan filled with hot water.
Nutrition
- Serving Size: 1 slice
- Calories: 450
- Sugar: 35
- Sodium: 300
- Fat: 30
- Saturated Fat: 18
- Unsaturated Fat: 12
- Trans Fat: 0.5
- Carbohydrates: 40
- Fiber: 1
- Protein: 7
- Cholesterol: 95