
Oh, listen for a moment. Can you smell that? That warm, yeasty aroma that instantly makes your whole house feel safe and cozy? That’s the smell of homemade comfort, and I rarely get through a week without needing a loaf of it in my kitchen. I know life gets fast here at MayaPlate; we’re all juggling deadlines, appointments, and everything in between. But I promise you, we can still bring that bakery magic home without spending half the day waiting for dough to rise! This recipe for french bread is truly my go-to secret weapon. It’s so simple, delivers that perfect combination of a soft, fluffy interior and a satisfyingly crisp crust, and you go from mixing bowl to cooling rack in under two hours. If you want to read more about why I started creating these practical recipes, you can check out my story on the About Page. Trust me, this is the easiest homemade bread you’ll ever bake.
- Why This Homemade French Bread Recipe is Your New Staple
- Gathering Ingredients for Your Soft French Bread at Home
- Step-by-Step Guide: Make French Bread from Scratch
- Tips for Success: Mastering Your Homemade French Bread Recipe
- Serving Suggestions for Dinner Side Bread
- Storage and Reheating Instructions for Fresh French Bread
- Frequently Asked Questions About Making French Bread
- Understanding the Nutrition of Your Homemade French Bread
- Share Your Best Homemade Bread Creations
Why This Homemade French Bread Recipe is Your New Staple
Look, I get it. Traditional bread recipes feel like a commitment you just can’t make on a Tuesday night. But honestly, this Easy French Bread has changed the game for me. The absolute best part is that we get that elusive bakery texture right here on a regular weeknight. It’s unbelievably rewarding to pull out two golden loaves when you only spent a little over an hour on active work.
Achieving Bakery Style Bread Texture Fast
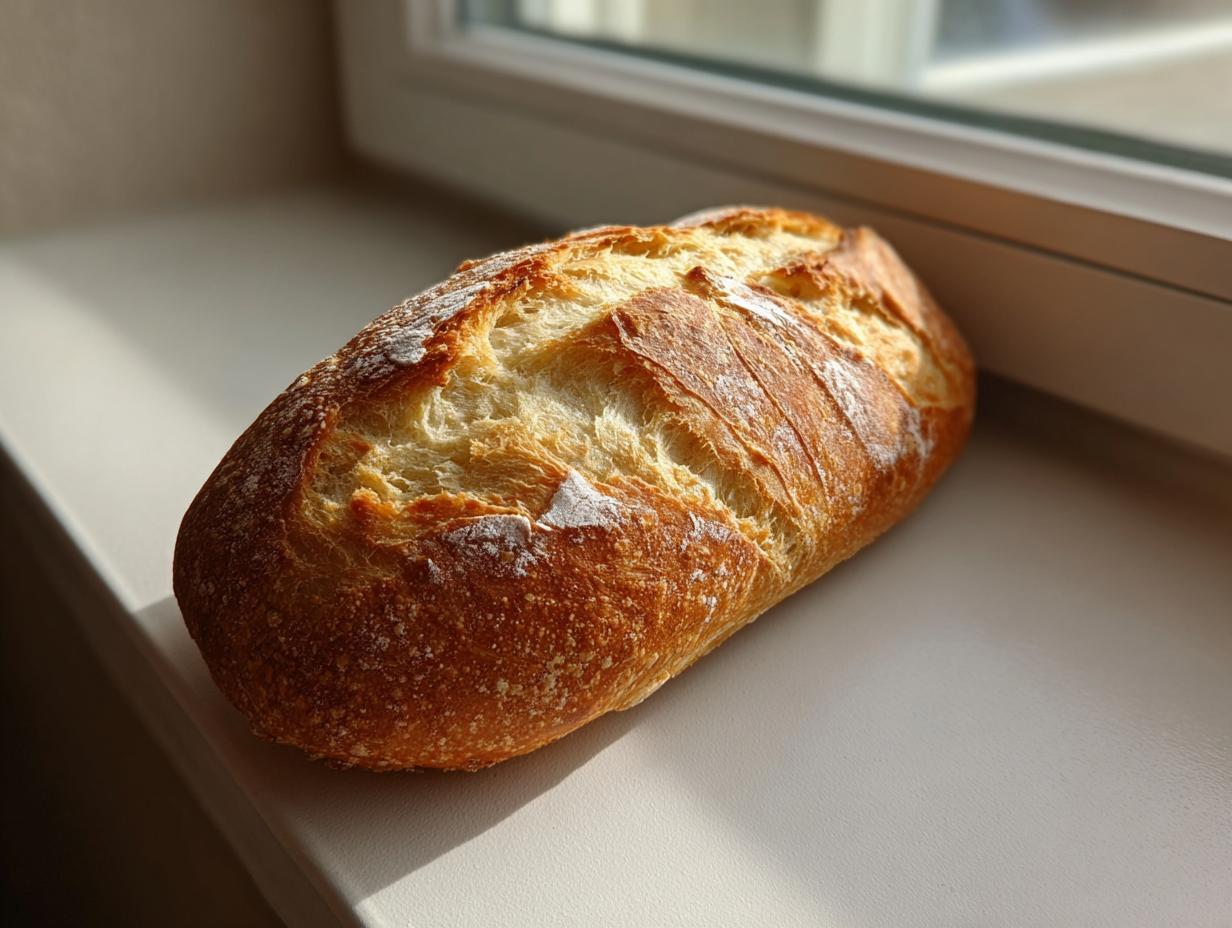
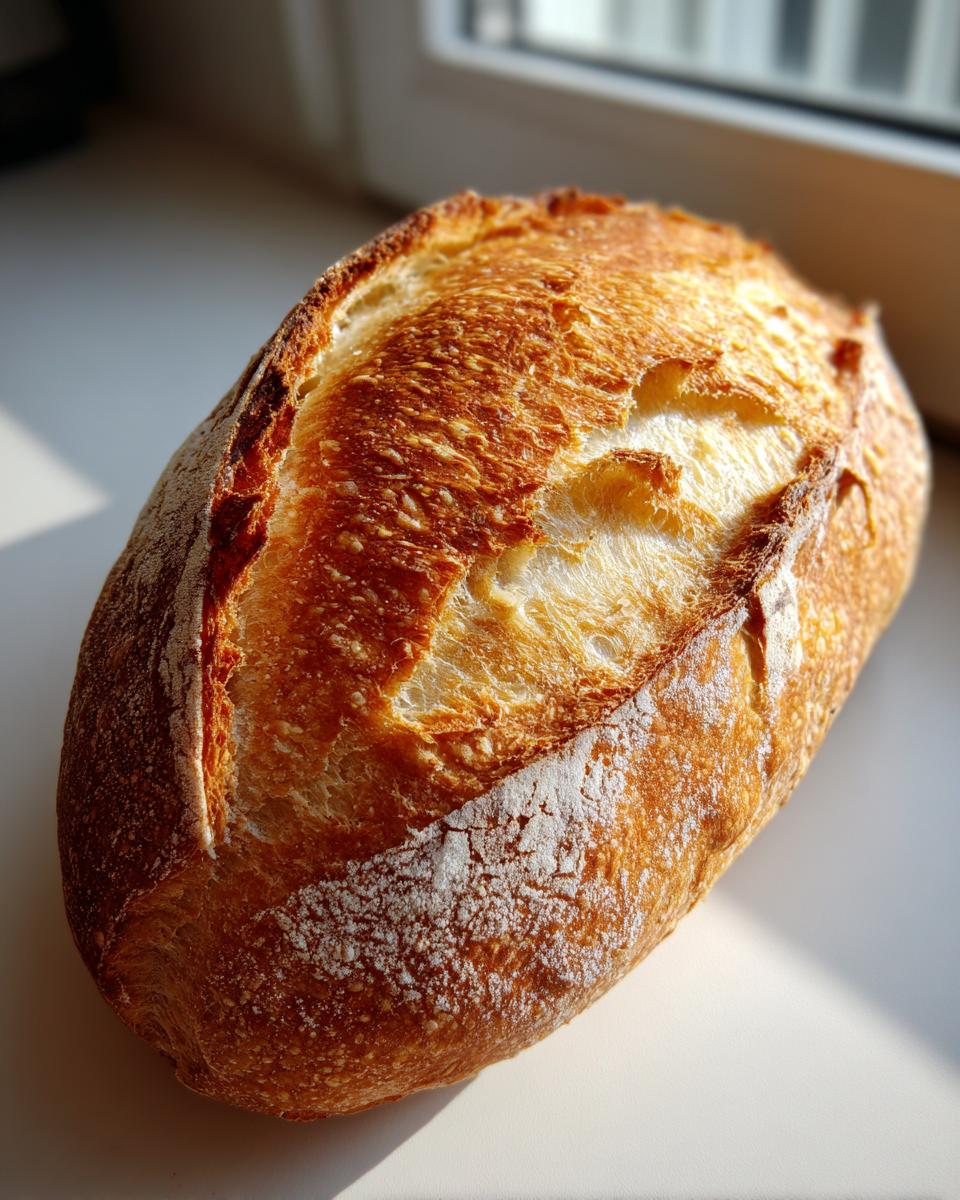
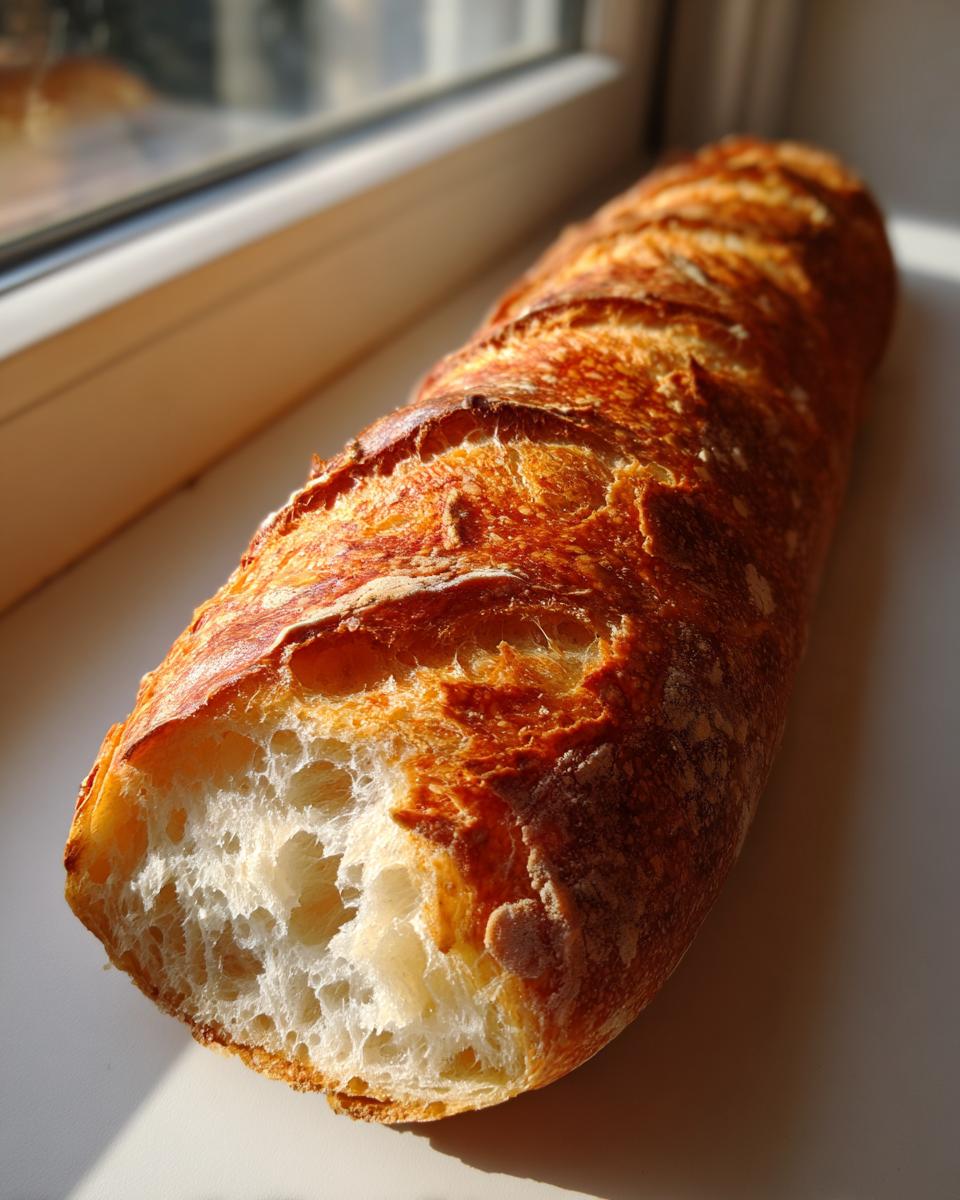
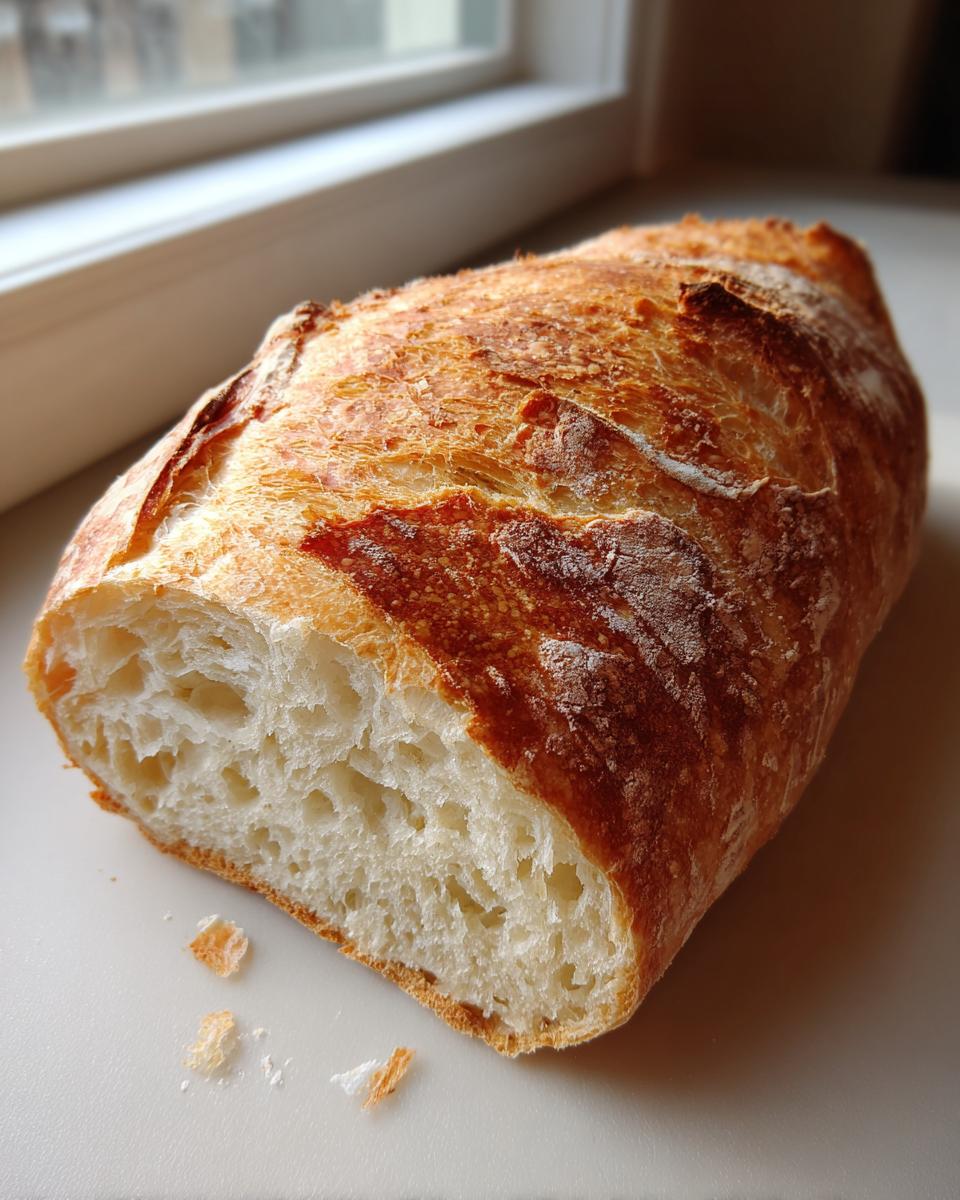
It’s all about balance! We want that crackly, crusty exterior bread that shatters a little when you press on it. But inside? I want a super soft interior—a truly Tender Crumb Bread that melts when you put butter on it. Because the steps are so straightforward, this is one of the best recipes out there for Beginner Bread Baking success. You won’t be fighting with sticky, uncooperative dough!
The Quick French Bread Recipe Timeline
This is where this recipe really sings compared to those 4-hour behemoths. We are looking at less than 20 minutes of hands-on time total. After the yeast wakes up, you mix, knead briefly, and let it puff for an hour. A quick shape, a short rest, and they’re in the oven! This Quick French Bread Recipe means you’re slicing into fresh bread right around dinner time. It saves so much effort!
Gathering Ingredients for Your Soft French Bread at Home
Alright, let’s get our setup ready! This recipe is wonderful because it uses pantry staples, but the magic is in those specific measurements. You’ll need yeast, sugar, salt, oil, water, flour, and just one egg white if you want that beautiful shine. Don’t stress about fancy flours here; we are keeping things straightforward for our Soft French Bread at Home.
Ingredient Notes and Substitutions for Perfect French Bread
Here are the non-negotiables! Your water has to be warm, not hot—aim for 105 to 115°F so you don’t shock your yeast. That single egg white? That’s strictly for brushing on top; it creates that gorgeous, shiny, Crusty Exterior Bread look we’re aiming for. And yes, plain all-purpose flour is perfect for this Simple Yeast Bread. I use it every time!
Step-by-Step Guide: Make French Bread from Scratch
Okay, deep breath! This is the part where we actually bring that wonderful french bread to life. Don’t let the steps intimidate you; they just break down the process into super manageable chunks. I’ve learned that timing is everything with yeast, so pay attention to those visual cues—that’s my way of transferring my kitchen experience straight to yours. Follow these steps exactly, and you’ll have two gorgeous loaves ready soon!
Activating Yeast and Mixing the Dough
First things first: we wake up the yeast! Dissolve that teaspoon of sugar right into your warm water—remember, around 105-115°F. Sprinkle on the yeast and walk away for about five to ten minutes. You need the top to get nice and foamy. If it doesn’t foam, oops, your water was too hot or your yeast is old, and you’ll need to start that step over. Once it’s bubbly, whisk in the tiny bit of olive oil, then dump it all into your bowl with the flour and salt blend. Stir that around until you literally can’t stir anymore and you have what I call a ‘shaggy dough’—it looks messy, and that’s perfect.
Kneading and the First Rise for Fluffy Loaf Recipe
Time to introduce the gluten! Turn that shaggy mess out onto a lightly floured spot on your counter. You are going to knead this for exactly five to seven minutes. You’re looking for elasticity; the dough should feel smooth and springy, not sticky anymore. Pop that ball into an oiled bowl, cover it up so it doesn’t dry out, and give it a warm spot to chill out for a full 60 minutes. You know it’s ready when it’s noticeably doubled in size. That’s the magic of the first rise!
Shaping, Scoring, and Baking Your French Bread
Gently punch the air out when that hour is up. Divide the dough in half and shape each piece into that classic long loaf shape, aiming for about 12 to 14 inches. Lay your two loaves gently onto that parchment-lined sheet. While they take their quick second rest (about 20 minutes—don’t skip this!), crank your oven up to 400°F. Right before they go in, you need to score them—use a very sharp knife to make three diagonal cuts across the top. Brush with that beaten egg white for the ultimate beautiful, shiny, **crusty exterior bread**. Bake for about 20 to 25 minutes until they are deeply golden brown and sound hollow when you tap the bottom!
Tips for Success: Mastering Your Homemade French Bread Recipe
Even though this is an easy recipe, a couple of little tricks I learned from perfecting this french bread really elevate it from good to ‘Wow, where did you buy this?’ The biggest thing, especially if you want that amazing, crackly crust, is controlling the steam in your oven. This technique mimics a professional bakery setup without needing any special gear!
Creating Steam for a Superior Crusty Exterior Bread
If you’re dreaming about that shatter—that gorgeous sound when you slice through the top—you have to create steam for the first 10 minutes of baking. I take a shallow, oven-safe pan and set it on the very bottom rack while the oven preheats to 400°F. Once the loaves are in the oven, I carefully pour about half a cup of boiling water into that hot pan—be so careful of the steam blast! That burst of moisture keeps the crust soft just long enough for the loaf to expand fully, and then, once the moisture burns off, you get that perfect Bakery Style Bread shell.
Now, if you actually prefer a slightly softer top—maybe you’re making amazing Bread for Sandwiches the next day—just skip the steam bath and lightly mist the loaves with water instead of using the egg white wash. Both ways yield fantastic bread, it’s just about what you’re craving that day!
Serving Suggestions for Dinner Side Bread
Look, this bread is so good, you don’t even need a reason to make it! But if you are baking it fresh for a weeknight meal, it truly shines as the ultimate Dinner Side Bread. Slice it thick and serve it alongside a big bowl of soup or pasta that needs something hearty to soak up all that delicious sauce.
Also, because this loaf gives you that lovely soft interior, it makes the absolute best foundation for sandwiches. Forget flimsy sliced bread; use this for hearty turkey melts or grilled cheese. It holds up beautifully, which is exactly what you want when you’re assembling Bread for Sandwiches!
Storage and Reheating Instructions for Fresh French Bread
I always tell people that the worst part about baking amazing bread like this **french bread** is that it never lasts long enough! But if you manage to save a loaf for the next day, you need to treat it right. You absolutely cannot store this bread in the refrigerator, or it turns hard faster than you can say ‘yeast.’
For day one, just leave it on the counter, cut-side down on a clean cutting board. The best way to preserve that gorgeous crust is to let it breathe a little. Plastic spoils the crust’s texture immediately, turning it soggy, and we worked hard for that satisfying crunch!
If you’ve made it to day two, you’ll want to refresh it. The easiest way to bring back that fresh-out-of-the-oven experience is by reheating. Wrap the entire loaf loosely—I mean loosely!—in foil and pop it into a 300°F oven for about 8 to 10 minutes. That foil traps just enough steam to soften the inside without making the crust mushy. If you want that crunch back, quickly unwrap it for the last two minutes of heating.
If you have more than you can eat tomorrow, freeze it! Once completely cool, wrap it tightly in plastic wrap, and then place that into a freezer bag. It freezes beautifully. When you’re ready to use it days or weeks later, just thaw it on the counter, and then follow that foil-wrapped reheating trick to bring it right back to life. Always skip the microwave; it just ruins the tender crumb structure we worked so hard to create!
Frequently Asked Questions About Making French Bread
I always get so many questions once people realize how easy it is to make Homemade French Bread Recipe! Baking can feel mysterious, but once you understand yeast and temperature, you are golden. Here are a few of the things I hear most often when folks are first trying their hand at this recipe. If you have other questions, don’t hesitate to reach out on the Contact Page!
Can I make this a One Hour Bread Recipe?
That’s the dream, isn’t it? While we nail that first rise in 60 minutes, you still have a second 20-minute rest for the shaped loaves, plus the baking time. So, realistically, this is a fantastic, quick homemade French bread recipe, clocking in under two hours total. But I want you to know that the active time is very low! It’s certainly much faster than anything that tastes this authentic, which is why I call it my speedy staple.
What if I want Chewy French Bread instead of soft?
That’s a great question about texture adjustment! If you’re looking for something with a little more pull, like a traditional French roll, you can try one thing: skip the egg white wash! That wash is what helps set that lovely, thin, crisp shell. If you skip it and just mist the dough lightly with water before baking, you’ll get a slightly thicker, chewier crust. You might also try using slightly less water when you first activate your yeast, just a tiny bit less, to keep the hydration down overall. This will definitely help achieve a Chewy French Bread texture.
Can I use Bread Flour instead of All-Purpose Flour for this French Bread?
You absolutely can, and this is where we get into the real baking science! Bread flour has a higher protein content than regular all-purpose flour. If you use bread flour, you’re going to develop more gluten structure, which generally means a slightly denser loaf with a more pronounced chew. Since our goal here is often that soft, fluffy loaf recipe, I stick to all-purpose flour. But if you are aiming for a baguette that holds up perfectly to heavy fillings, bread flour is a great move. Just be prepared to knead for the full seven minutes to ensure you develop that strength!
Understanding the Nutrition of Your Homemade French Bread
Now, I know some of you are tracking macros or just curious about what goes into these beautiful loaves of french bread we’ve just made. As a nutritionist, I always believe in transparency, even when we’re talking about comforting carbohydrate-heavy beauties like this! Remember, these numbers are just estimates, calculated based on the entire recipe yielding two perfect loaves, so we’re looking at the nutritional information per slice.
You’ll be happy to see that since we haven’t added a ton of sugar or fat for preservatives, the profile is pretty clean overall for a white loaf. It’s genuinely satisfying to know exactly what you’re serving your family when you bake from scratch!
Here’s the breakdown based on the ingredients listed:
- Serving Size: 1 slice
- Calories: 140
- Fat: 2g (Saturated Fat: 0.5g)
- Carbohydrates: 27g
- Protein: 4g
- Sugar: 1g
- Sodium: 250mg
See? Only 1 gram of sugar per slice! That’s because most of the natural sweetness comes from balancing the small amount of white sugar we use to feed the yeast with the other non-sweet ingredients. When you bake this yourself, you control every element. If you’re looking for more information on how we approach balanced recipes here at MayaPlate, you can always check out our Privacy Policy page, which touches on our overall philosophy for responsible, delicious cooking.
Share Your Best Homemade Bread Creations
Now that you’ve experienced the sheer joy of pulling a piping hot, crusty loaf of homemade french bread out of your oven, I really want to know what you think! Seriously, nothing makes me happier than knowing this recipe worked its magic in your kitchen just like it does in mine. Did you go for the crusty exterior, or did you manage to keep it softer for tomorrow’s sandwiches? Don’t be shy!
Please drop by the comments down below and leave a rating for this recipe. Five stars if it officially replaced your store-bought bread! I love seeing photos of your bakes—so tag us on social media when you share your golden loaves. Hearing about your successes is what keeps me excited about baking for all of you busy folks!
PrintEasy Homemade Soft and Crusty French Bread (Ready in Under 2 Hours)

Bake delicious homemade French bread fast. This simple recipe delivers soft, golden loaves with a desirable crust, perfect for dinner or sandwiches. It is much easier than you think to get this result every time you bake.
- Prep Time: 20 min
- Cook Time: 25 min
- Total Time: 1 hour 45 min
- Yield: 2 loaves 1x
- Category: Baking
- Method: Baking
- Cuisine: French
- Diet: Vegetarian
Ingredients
- 1 packet active dry yeast
- 1 teaspoon sugar
- 1 cup warm water (about 105-115°F)
- 3 cups all-purpose flour, plus more for dusting
- 1 1/2 teaspoons salt
- 1 tablespoon olive oil
- 1 egg white, lightly beaten (for wash)
Instructions
- Activate the yeast: In a small bowl, dissolve the sugar in the warm water. Sprinkle the yeast over the top and let it sit for 5 to 10 minutes until foamy.
- Mix the dough: In a large bowl, combine the flour and salt. Pour in the yeast mixture and the olive oil. Mix with a wooden spoon until a shaggy dough forms.
- Knead: Turn the dough out onto a lightly floured surface. Knead for 5 to 7 minutes until the dough is smooth and elastic.
- First Rise: Place the dough in a lightly oiled bowl, turning to coat. Cover the bowl with plastic wrap or a clean kitchen towel. Let the dough rise in a warm place for 60 minutes, or until doubled in size.
- Shape the loaves: Gently punch down the dough. Divide it into two equal pieces. Shape each piece into a long, even loaf shape, about 12 to 14 inches long. Place the shaped loaves on a baking sheet lined with parchment paper.
- Second Rise: Cover the loaves loosely and let them rest for 20 minutes. Preheat your oven to 400°F (200°C) during this time.
- Score and Wash: Use a sharp knife or razor blade to make three diagonal slashes across the top of each loaf. Brush the tops lightly with the beaten egg white for a shiny, crusty exterior.
- Bake: Bake for 20 to 25 minutes, or until the crust is deep golden brown and the bread sounds hollow when tapped on the bottom.
- Cool: Transfer the loaves to a wire rack to cool completely before slicing. Enjoy this fresh baked bread with melted butter.
Notes
- For a crispier crust, place a shallow pan of water on the bottom rack of the oven while preheating to create steam.
- If you want a softer crust, skip the egg white wash and simply mist the loaves with water before baking.
- This bread is perfect for making sandwiches or serving as a dinner side bread.
Nutrition
- Serving Size: 1 slice
- Calories: 140
- Sugar: 1
- Sodium: 250
- Fat: 2
- Saturated Fat: 0.5
- Unsaturated Fat: 1.5
- Trans Fat: 0
- Carbohydrates: 27
- Fiber: 1
- Protein: 4
- Cholesterol: 0