
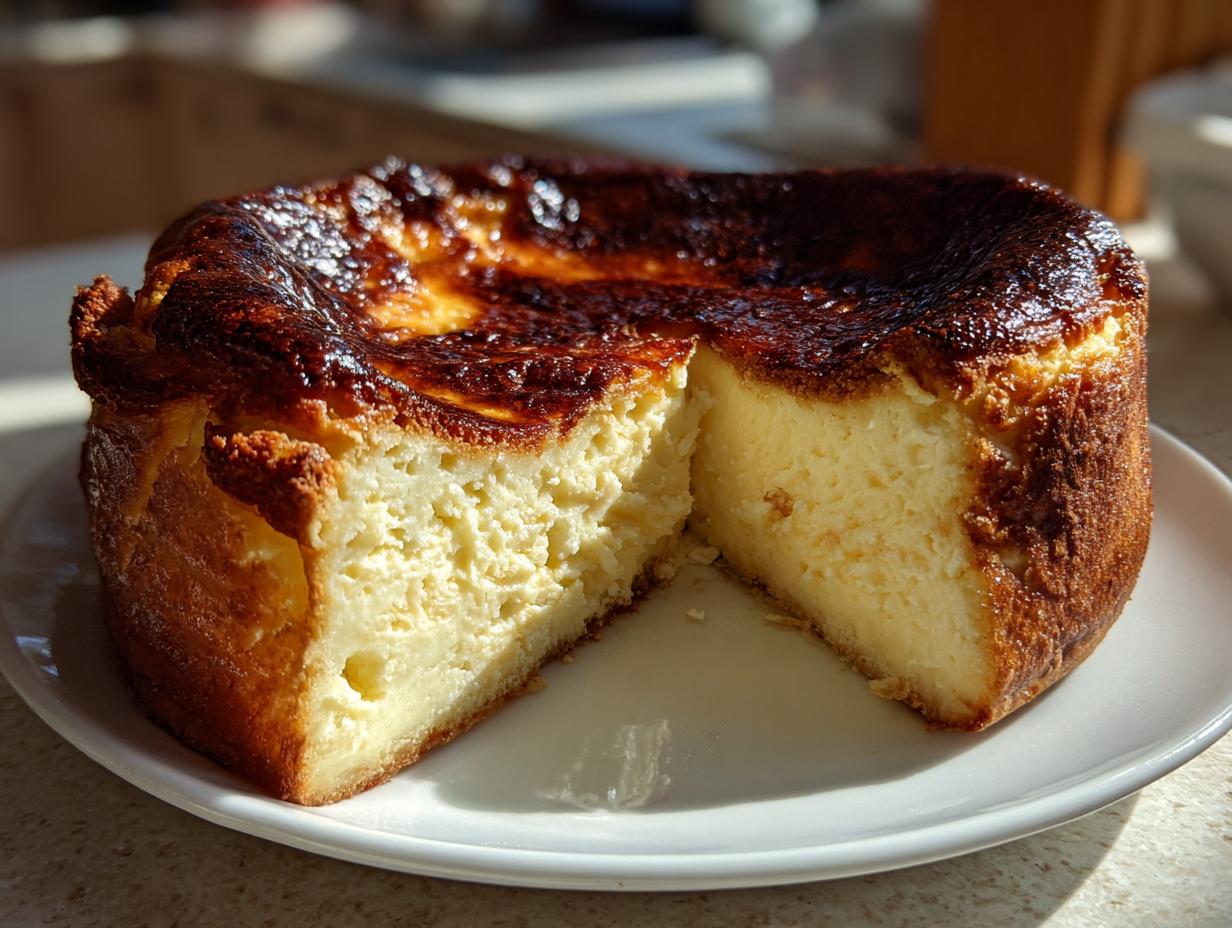
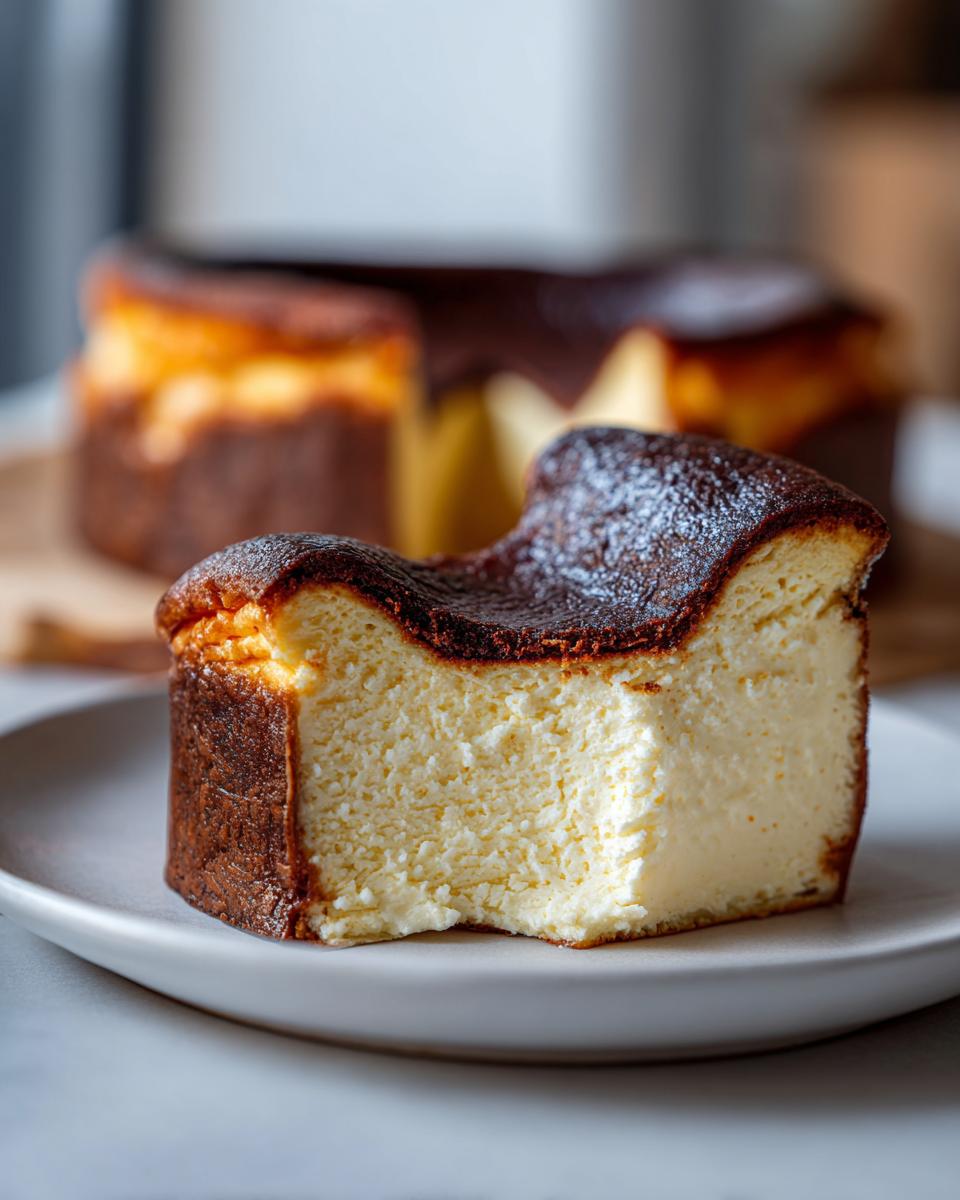
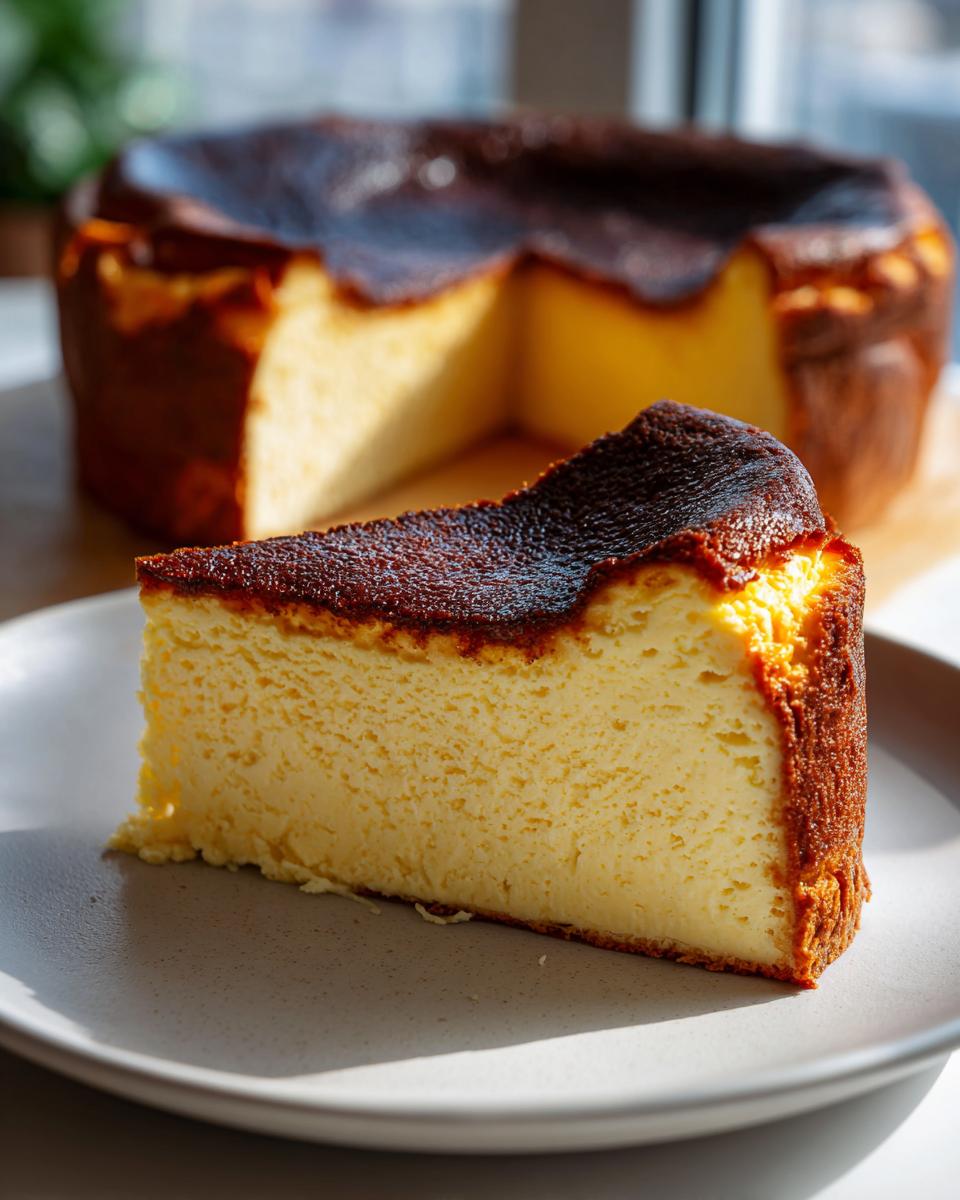
Okay, listen up. We’ve all seen the photos—that dramatically cracked, deeply dark top giving way to a center that looks like pure, luscious velvet. The Basque Burnt Cheesecake is everywhere, and honestly, I get why. It looks impossibly chic, right? But I know what you’re thinking: *Is it going to be complicated? Will it collapse?* Never fear! When I started developing this, I made sure it fit right here at MayaPlate. I’m Maya Thompson, and my whole mission is taking those fancy-sounding concepts and making them genuinely practical for your weeknight table. So forget the water baths and the stress; this is the Ultimate Easy Basque Burnt Cheesecake Recipe that actually delivers that perfect contrast every single time.
We’re skipping all the fussy steps you see elsewhere. This recipe focuses purely on simplicity and guaranteed texture. You’re going to love whipping this up! If you want to see more of our delicious dessert recipes, check out this collection.
- Why This is the Best Basque Burnt Cheesecake Recipe You Will Make
- Simple Ingredients for Your Basque Burnt Cheesecake
- How To Make Basque Burnt Cheesecake: Step-by-Step Tutorial
- Tips for Success with Your Homemade Burnt Cheesecake
- Variations for Your Basque Burnt Cheesecake
- Serving Suggestions for this Decadent Spanish Dessert
- Storage and Reheating Instructions for Basque Burnt Cheesecake
- Frequently Asked Questions About the Basque Burnt Cheesecake
- Nutritional Estimate for Your Creamy Cheesecake Dessert
- Share Your Experience Making This Viral Cheesecake Recipe
Why This is the Best Basque Burnt Cheesecake Recipe You Will Make
I know you’re probably scrolling through a hundred different versions, wondering which one will actually work without giving you a dense, lukewarm mess. That’s why I built this recipe specifically to solve the biggest issues people have with this Basque Cheesecake Recipe. Trust me, we are keeping things simple!
- You get that gorgeous, rustic look with the dramatically crinkled parchment—no fancy springform removal needed.
- Absolutely no water bath required! I hate that messy process just as much as you do. We rely on high heat instead.
- The texture contrast is the star: deeply caramelized on the outside, totally mousse-like inside.
It’s designed to be an impressive dinner party dessert without demanding a culinary degree. If you’re looking for foolproof bread bowls while this sets up, I’ve got a killer sourdough recipe you can try next!
Achieving the Signature Creamy Cheesecake Center
The secret to that dreamy Velvety Cheesecake Center is actually two-fold: patience with your ingredients and hardly mixing the batter once the eggs go in! Make sure your cream cheese and mascarpone are truly soft—like butter—not just slightly cool. We only mix enough to combine. Overmixing whips in too much air, which leads to a dense cake rather than that custardy wobble we want in this Creamy Cheesecake Dessert.
Perfecting the Caramelized Top Dessert Finish
This is where we lean into the ‘burnt’ part! We crank the heat way up. The high temperature hits the sugar fast, causing that beautiful, almost black char on top quickly, which seals in all the moisture below. It’s a rapid roast. You’re basically flash-caramelizing the surface. Don’t panic when it looks too dark; that’s exactly what you’re aiming for to get that perfect Caramelized Top Dessert.
Simple Ingredients for Your Basque Burnt Cheesecake
I love this part because the list is so short! Honestly, this Easy Cheesecake Recipe proves you don’t need a pantry full of exotic items for something this stunning. We are focusing on quality dairy here. Remember, there is no crust, so every bite is pure, creamy delight.
- 1.5 lbs cream cheese, room temperature
- 8 oz mascarpone cheese, room temperature
- 1 1/4 cups granulated sugar
- 4 large eggs, room temperature
- 2 large egg yolks, room temperature
- 1 3/4 cups heavy cream
- 1 tablespoon all-purpose flour
- Pinch of fine sea salt
Ingredient Notes and Substitutions for Basque Burnt Cheesecake
If you take away just one piece of advice from me, let it be this: ROOM TEMPERATURE! If your cream cheese or eggs are cold, you’re going to end up with little lumps in your batter, and that messes up the smooth texture we are striving for here in this Homemade Burnt Cheesecake. Don’t rush this step. We only use one tablespoon of flour—it’s just there to give the custard a *tiny* bit of backbone so it doesn’t completely liquefy, but it won’t make it dense, I promise!
How To Make Basque Burnt Cheesecake: Step-by-Step Tutorial
Alright, let’s get baking! This is the fun part where we turn that smooth batter into that viral dessert everyone’s talking about. Don’t worry about precision here in the classic sense—this Basque Burnt Cheesecake Recipe is supposed to look a little rustic and wild. We’re aiming for texture, remember? If you want another look at an easy cheesecake recipe while you wait for this to bake, check out my collection later!
Preparing the Pan and Oven for the Basque Burnt Cheesecake Recipe
First thing first: grab your 8-inch springform pan. You absolutely need two big sheets of parchment paper, way bigger than the pan! I overlap them so the paper hangs way over the sides—like 2 or 3 inches of overhang all around. This is what gives you those gorgeous, crinkled edges when it bakes. Trust me, don’t skimp on the paper! Preheat your oven to 400°F (200°C). And I’ll say it loud and clear for everyone worried about tradition: No Water Bath Required! Seriously, set aside that roasting pan; we’re not using it.
Mixing the Creamy Cheesecake Batter for Your Basque Burnt Cheesecake
Start with your cheeses—they must be soft! Beat the cream cheese and mascarpone until they look like smooth silk, scraping down the bowl every 30 seconds. Then, add the sugar and beat it just until it disappears. Next, add your room-temperature eggs, one at a time, only mixing until they incorporate. Resist the urge to whip it! Once the cream and the flour/salt mix go in, switch to low speed or grab a spatula. We’re just folding until the streaks of flour vanish. Anything more, and we risk losing that Velvety Cheesecake Center.
Baking and Cooling the Caramelized Top Dessert
Pour that gorgeous, thin batter into your prepared pan. Pop it in the 400°F oven and set a timer for 50 minutes. By 60 minutes, you want the edges set, but the center? It needs a *serious* wobble—like soft jello. If it looks pale after 55 minutes, crank the oven up to 425°F (220°C) for just five final minutes to really get that deep color for your Caramelized Top Dessert. Once out, let it sit on the counter for at least three hours before even thinking about chilling it. This cooling process is vital for setting that creamy texture! For a deep dive into making this recipe work perfectly, you can read how others succeeded here: Indulge in the Creamy Delight of Burnt Basque Cheesecake!
Tips for Success with Your Homemade Burnt Cheesecake
Even though this is known as an Easy Cheesecake Recipe, nailing that texture takes a little know-how. I dug through my notes on what always makes the difference between a good one and one that makes people swoon, and it mostly comes down to temperature management. Follow these few simple tricks, and you’ll nail that perfect soft velvet center every time.
First up, that room temp rule I keep harping on? It’s game-changing. Your cream cheese has to be able to blend without any graininess, and the eggs need to be warm enough not to seize up the batter when added. If you’re short on time, you can quickly microwave your dairy for about 10 seconds, but watch it closely—we want soft, not soup!
When you pull it out of the oven, don’t panic about how jiggly that center looks. That significant wobble is exactly what you want! It’s underbaked by design. Once it cools on the counter for those several hours, it sets up beautifully. You know what else is wonderfully gooey? My recipe for Rich, Gooey Chocolate Chess Pie. You should try that next!

Lastly, when it comes time to serve this heavenly Decadent Spanish Dessert, resist the urge to slice it straight from the fridge. If it’s icy cold, the texture tightens up. For the absolute best experience, take it out about 30 minutes before serving. Letting it come up closer to room temperature is the final step to maximizing that incredible, creamy, melt-in-your-mouth finish.
Variations for Your Basque Burnt Cheesecake
Once you’ve mastered the ultimate Basque Burnt Cheesecake Recipe—and trust me, once you see that crackled top, you will have mastered it—you might want to play a little! This base recipe is so forgiving and rich that it handles small additions beautifully. It’s all about adding complexity without losing that signature, rustic charm.
My favorite little tweak when I’m feeling fancy is adding some bright citrus. A tablespoon of pure vanilla extract is lovely, but if you want a real zing to cut through all that richness, grate in the zest of half an orange right when you add the sugar. It complements the caramelized notes perfectly! Another trick that works wonderfully is adding just a splash—maybe a teaspoon—of something stronger, like a mild brandy or a nice dark rum, right with the heavy cream. It just deepens the flavor complexity of this decadent Spanish dessert.
For more smart ways to use up seasonal produce in simple bakes, you should take a look at this Lemon Zucchini Bread recipe. It’s another one of those brilliant, flavor-packed recipes that looks way more complicated than it actually is!
Baking the Basque Burnt Cheesecake in a Loaf Pan
I get so many questions asking if this Crustless Cheesecake Baking method works in different pans, and the answer is a resounding YES! If you want to skip the traditional round pan or if you just want to make a smaller batch, switching to a loaf pan is fantastic. Since a loaf pan is much narrower, you need to adjust your parchment paper setup. You’ll still want huge sheets, but you need to crisscross them more deliberately to ensure you have plenty of paper sticking up over the long sides. This parchment cape is your insurance policy against sticking!
The main thing to watch for when using a loaf pan for your Homemade Burnt Cheesecake is that the center takes longer to set because the heat has to travel up a higher, narrower column of batter. You might need to bake it for an extra 10 to 15 minutes compared to the round pan. Keep checking that center wobble; when it looks like very soft custard, pull it out! It will firm up as it cools down.
Serving Suggestions for this Decadent Spanish Dessert
Okay, you’ve waited patiently (and yes, it was hard, I know!), and now you have this gorgeous, rustic marvel sitting on the counter. How do you actually serve this incredible Decadent Spanish Dessert? This is where so many people mess up the texture because they serve it straight from the absolute deepest freeze of the refrigerator.
Remember how I talked about that creamy texture? To get that perfect, almost soufflé-like center, you need to let it warm up just a touch. Take your Basque Burnt Cheesecake out of the fridge about 20 to 30 minutes before slicing. It shouldn’t be fully room temperature, but definitely not ice-cold. That slight warming takes the dense edges off and lets that velvety center really shine. It makes all the difference!
Because this cake is so intensely rich and slightly smoky from the char, it really doesn’t need much else. A simple, light pairing works best to cut through the fat. My go-to is just a tiny dusting of powdered sugar—but if you want something really special, a tart fruit accompaniment is amazing.
Think tart berries! A quick homemade raspberry coulis, maybe just raspberries cooked down briefly with a little water and sugar, is phenomenal. If you want to try making some amazing biscuits to go alongside your next batch of desserts, my classic biscuit shortcake recipe is phenomenal for pairing with fruit sauces!

If you are feeling adventurous and want to see a beautiful example of how tart berries complement this cake, check out how they do it in this amazing recipe featuring a raspberry coulis: Burnt Basque (San Sebastián Style) Cheesecake With Raspberry Coulis. It’s just stunning!
Storage and Reheating Instructions for Basque Burnt Cheesecake
So, you managed not to eat the entire Basque Burnt Cheesecake in one sitting? Good job, self-control! Since this is naturally a very rich slice of heaven, it’s great for making ahead, but you have to store it right to keep that creamy center intact. This isn’t like a regular cake where you just slap plastic wrap on it; we need to respect the custard!
Once it’s completely cooled to room temperature (remember that 3-hour stretch?), wrap the whole thing tightly, parchment and all, in plastic wrap. Then, pop it into the fridge. It keeps beautifully for about four to five days. I find the texture actually gets slightly denser and really good by day two, but that glorious caramel top starts to soften a tiny bit, which is totally normal for this style of Crustless Cheesecake Baking.
Now, the reheating part—this is crucial for getting that perfect texture back. Remember how I said serving it straight from the fridge mutes the flavor and texture? Don’t just pull it out 10 minutes before serving. For the best experience with your Creamy Cheesecake Dessert, take the wrapped cheesecake out of the fridge about an hour before you plan to eat it. Letting it sit on the counter allows it to gently warm up. This brings back that essential silky mouthfeel we worked so hard to achieve with the high-heat bake. It’s my favorite way to enjoy this Viral Cheesecake Recipe the next day!
Frequently Asked Questions About the Basque Burnt Cheesecake
I know after you make this incredible Basque Burnt Cheesecake, you’ll have questions! It’s so different from the dense, chilled cheesecake you might be used to. I’ve gathered a few of the most common things folks ask me when they first try this viral sensation. If you’re looking for another creamy favorite, you have to check out my creamy baked mac and cheese recipe!
Why is my basque burnt cheesecake not getting a dark top?
This is the number one worry! If you’ve hit the 55-minute mark and your top is still golden blonde, the first thing to check is your oven temperature. Ovens lie sometimes! If you have an oven thermometer, check if you are truly hitting 400°F. If you are, then it’s time for the emergency blast: slide that rack up to the top level (if you haven’t already) and crank the heat to 425°F for a solid 3 to 5 minutes. Watch it like a hawk during those last few minutes—you want it deeply caramelized, almost black in spots, but don’t let the center start churning! That contrast is everything for this Caramelized Top Dessert.
Can I skip chilling this Easy Cheesecake Recipe?
Oh, I wish you could! If you serve this Easy Cheesecake Recipe immediately out of the oven, it will be a puddle of warm cream—lovely, yes, but you won’t get that classic texture. Chilling for at least six hours, preferably overnight, is required for the custard to set up enough so it doesn’t run everywhere when you slice it. BUT, here’s the trick: don’t serve it straight from the fridge. Remember, we want that melt-in-your-mouth feel. Pull it out about 30 minutes before you serve to let it warm up slightly from ice-cold. That temperature modulation is how we achieve the perfectly soft center!
What is the difference between this and a regular cheesecake?
The difference is huge, and it’s all about texture and temperature! A traditional New York style cheesecake is dense, heavy, and baked low and slow, often in a water bath, to prevent any color or cracking. This San Sebastian Cheesecake is the opposite! We bake it FAST at a very high heat. That creates the crackly, charred top, and crucially, we intentionally *underbake* the center so it stays light, airy, and gloriously jiggly. Plus, we skip the crust entirely! It’s a truly different, much more rustic and creamy experience.
Nutritional Estimate for Your Creamy Cheesecake Dessert
Now, I know what you’re thinking as you enjoy this rich, decadent slice of heaven—what am I actually putting into my body? Since I focus so much on wholesome eating here at MayaPlate, I always want to be upfront about the fuel we’re using. This Creamy Cheesecake Dessert is definitely an indulgence, but knowing the numbers helps when planning your week!
Please keep in mind that these figures are always estimates based on the excellent ingredients listed in the recipe above. Your exact results might vary based on the specific brands of cream cheese or cream you use. These numbers break down what’s in one standard slice after you cut up your glorious creation.
- Serving Size: 1 slice
- Calories: 450
- Sugar: 35g
- Fat: 35g (with 22g Saturated Fat)
- Carbohydrates: 28g
- Protein: 7g
- Cholesterol: 180mg
It’s certainly rich, but that fat content is what keeps the texture so incredibly satisfying and velvety! Enjoy this absolutely wonderful Basque Burnt Cheesecake, knowing it’s made with simple, high-quality dairy. It’s worth every delightful calorie!
Share Your Experience Making This Viral Cheesecake Recipe
Whew! You made it! You successfully navigated the high heat, you let it cool—and hopefully, you’ve been rewarded with that signature, slightly burnt top and the most unbelievably creamy interior. Seriously, I want to hear all about it!
This Viral Cheesecake Recipe is always better when shared. I pour so much heart into making sure these recipes work for you, and seeing your results makes the whole process worth it. Did you nail that jiggly center? Did your parchment paper look impressively rustic? Please don’t keep that success a secret!
Head down to the comments below and leave a star rating—even if you only made it halfway through the cooling process! Tell me what you paired it with. Did you go rustic with just sugar, or did you try a tart berry sauce? I absolutely love seeing your photos shared on social media; tag me so I can cheer you on!
If you have any last-minute questions or if you need to reach out for baking advice, the contact page is always open. Thank you so much for trusting me with your Basque Burnt Cheesecake adventure. Go enjoy every last, decadent bite!
PrintThe Ultimate Easy Basque Burnt Cheesecake Recipe
Make this crustless Basque Burnt Cheesecake with a perfectly caramelized top and a creamy, velvety center. This simple recipe requires minimal ingredients and no water bath, delivering decadent Spanish dessert flavor.
- Prep Time: 15 min
- Cook Time: 60 min
- Total Time: 7 hours 15 min
- Yield: 8 servings 1x
- Category: Dessert
- Method: Baking
- Cuisine: Spanish
- Diet: Vegetarian
Ingredients
- 1.5 lbs cream cheese, room temperature
- 8 oz mascarpone cheese, room temperature
- 1 1/4 cups granulated sugar
- 4 large eggs, room temperature
- 2 large egg yolks, room temperature
- 1 3/4 cups heavy cream
- 1 tablespoon all-purpose flour
- Pinch of fine sea salt
Instructions
- Line an 8-inch springform pan with two large sheets of parchment paper, allowing the paper to overhang significantly on all sides. This creates the rustic, crinkled edges.
- Preheat your oven to 400°F (200°C). Do not use a water bath.
- In a large bowl, use an electric mixer or a sturdy spatula to beat the room-temperature cream cheese and mascarpone until completely smooth. Scrape down the sides often.
- Add the granulated sugar to the cream cheese mixture and beat until just combined and smooth. Do not overmix at this stage.
- Beat in the eggs one at a time, mixing only until each egg is incorporated before adding the next. Mix in the egg yolks.
- Slowly stream in the heavy cream while mixing on low speed until the batter is uniform.
- In a small bowl, whisk together the flour and salt. Gently whisk this dry mixture into the batter until no streaks remain. The batter will be thin.
- Pour the batter into the prepared pan.
- Bake at 400°F (200°C) for 50 to 60 minutes. The top should be deeply caramelized, almost black in spots, and the edges should be set. The center should still have a significant wobble, like soft gelatin.
- Remove the cheesecake from the oven. It will deflate significantly as it cools. Let it cool completely on a wire rack at room temperature for at least 3 hours.
- Chill the cheesecake in the refrigerator for at least 6 hours, or preferably overnight, before serving. Serve at room temperature for the best creamy texture.
Notes
- Use room temperature ingredients for the smoothest, creamiest batter.
- For the best caramelized top, increase the oven temperature to 425°F (220°C) for the last 5 minutes of baking if the top is not dark enough.
- This cheesecake is best served slightly warmer than refrigerator temperature to achieve the signature velvety center.
Nutrition
- Serving Size: 1 slice
- Calories: 450
- Sugar: 35
- Sodium: 250
- Fat: 35
- Saturated Fat: 22
- Unsaturated Fat: 13
- Trans Fat: 0.5
- Carbohydrates: 28
- Fiber: 0
- Protein: 7
- Cholesterol: 180