
If you’re anything like me, when game day rolls around or when unexpected guests pop over, you need an appetizer that screams “delicious” without yelling “I spent all day cooking!” I get it; life is busy, but our food shouldn’t feel like an afterthought. That’s exactly why I perfected these grinder sliders. They capture that incredible, robust flavor of a classic Italian sub but shrink it down into the friendliest, most fun-to-eat little bites!
Forget fussy plating; these pull-apart sandwiches, built on sweet Hawaiian rolls with layers of savory deli meat and finished with a zingy glaze, are the definition of accessible flavor, just like we aim for here at MayaPlate. Seriously, if you loved how easy my easy taco pinwheels were, you are going to become obsessed with these for feeding a crowd.
Trust me, when you slide that pan out of the oven smelling like garlic and toasted cheese, everyone will zero in on them immediately. They are truly the perfect crowd-pleasing solution!
- Why You Will Love These Italian Grinder Sliders Recipe (Easy Baked Sliders)
- Gathering Ingredients for Your Grinder Sliders
- How to Prepare Hot Grinder Sandwiches Mini (Step-by-Step)
- Tips for Success Making Your Grinder Sliders
- Make-Ahead & Freezer Tips for Pull Apart Italian Sandwiches
- Serving Suggestions for Your Cheesy Baked Sandwiches
- Storage and Reheating Instructions for Leftover Grinder Sliders
- Frequently Asked Questions About Grinder Sliders
- Nutritional Estimate for Flavor Packed Sliders
- Nutritional Estimate for Flavor Packed Sliders
Why You Will Love These Italian Grinder Sliders Recipe (Easy Baked Sliders)
When I’m planning for a big watch party or just trying to get a satisfying dinner on the table fast, I need recipes that deliver maximum flavor impact with minimum cleanup. That’s why these Italian Grinder Sliders Recipe quickly became my go-to in the kitchen. They check every single box!
- These are unbelievably simple to put together—you are basically just slicing bread, layering, and baking. Total game-changer for game days!
- Since they use slider rolls, they are the ultimate game day sliders appetizer. Everyone can grab one or two without feeling like they ruined their dinner plans before the main course even hits.
- The flavor doesn’t stop at the cheese layer. That buttery, herby glaze sinks into the sweet rolls, giving you a depth of taste you usually only get from a slow-cooked Italian sub.
- They handle a crowd like a dream! You can assemble the meat and cheese the night before—hello, stress-free hosting!
- They feel gourmet without requiring any complex layering or sauce-making beforehand.
Perfect Party Sandwich Sliders for Any Crowd
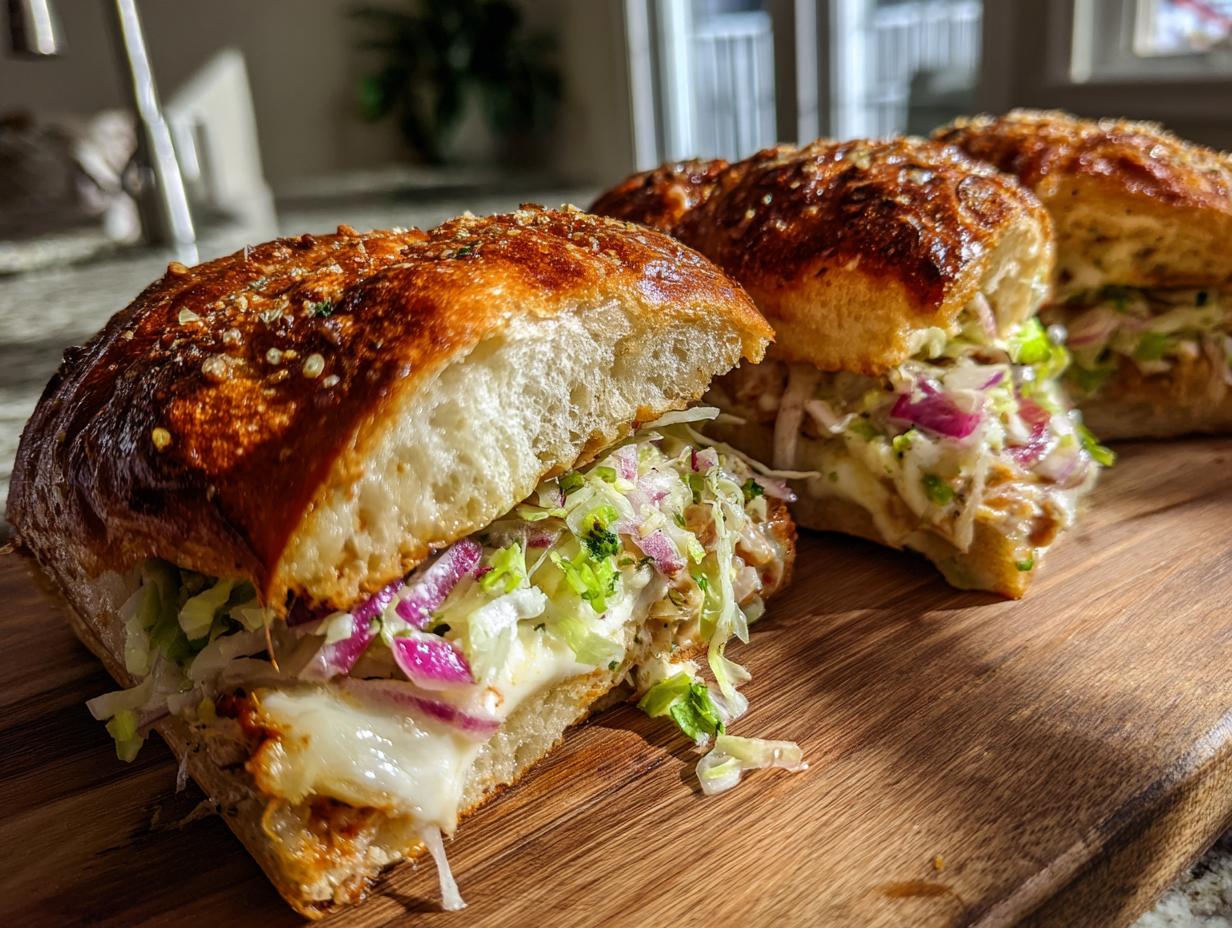
Honestly, the best part about using the slider package is how wonderfully they bake together. You slice the whole unit horizontally, and when they come out of the oven, they are perfectly connected. Then, you just use a large spatula or knife to slice between the little sandwiches. It’s instant portion control, and nobody hogs the best-looking sandwich!
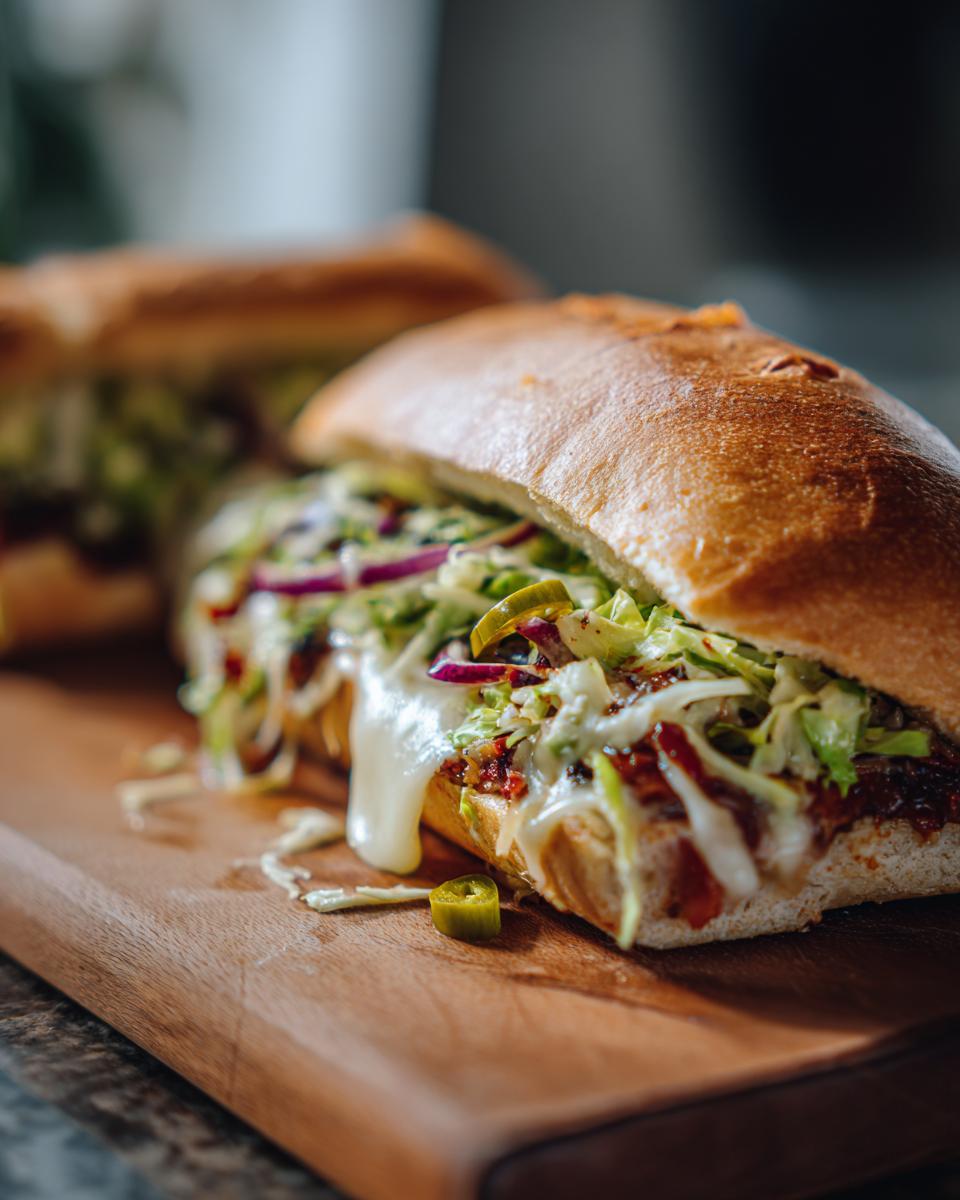
Flavor Packed Sliders with Savory Glazed Sliders Finish
If you just baked these with meat and cheese, they’d be good. Fine, even! But we want *amazing*, right? That’s where the savory part of the Savory Glazed Sliders finish comes in. That buttery topping melts right into the top bun while they bake, making the crust slightly crispy and totally addictive. And when we top it with that tangy grinder salad? Wow. It gives you the fresh crunch you expect from a great sub, but baked hot!
Gathering Ingredients for Your Grinder Sliders
Okay, you can’t make flavor-packed sandwiches without the right gear, right? This recipe is all about layering quality ingredients so that every single bite of your Grinder Sliders tastes like you spent hours at the deli counter. Since we are doing a baked slider, the rolls are super important. You absolutely have to grab that package of sweet slider rolls—like the classic Hawaiian ones—because the slight sweetness cuts through the saltiness of the meat perfectly. It’s crucial!
For the meats, I’m laying out exactly what I use below, but remember, you’ll need about 12 slices of each kind since we’re aiming for 12 individual Deli Meat Sliders.
- 1 package (about 12 count) of those sweet slider rolls
- 12 slices good quality ham
- 12 slices salami (the good, thin kind!)
- 12 slices pepperoni
- 12 to 14 slices provolone cheese—get the good stuff that melts nicely!
For the Savory Glaze and Topping
Here’s where we separate the good from the *amazing*. You’ve got your initial glaze ingredients that go on before baking, and then we make the fresh grinder salad topping that goes on *after* the bake for that fresh crunch. My tip, straight from the notes, is that if you want an extra layer of zing, spread just a tiny bit of Dijon mustard on the bottom rolls before you start stacking the meat. It really wakes everything up!
For that beautiful baked crust and the fresh crunch, gather these:
- For the Glaze: We need about 1/2 cup of mayo, whisked together with olive oil, red wine vinegar, and part of the Italian seasoning.
- For the Grinder Salad Topping (mix this while the sliders bake): You’ll need the rest of your shredded iceberg lettuce, some red onion sliced super thin, those slightly spicy pepperoncini peppers, and a splash of that pepperoncini juice for extra tang.
See? Deliciously Simple, just how we like it around here! If you’re looking for other easy, crowd-pleasing starters while these bake, you should definitely check out my recipe for sausage cream cheese dip.
How to Prepare Hot Grinder Sandwiches Mini (Step-by-Step)
Getting these amazing grinder sliders ready is seriously straightforward. Once you have all your ingredients laid out, you’ll be amazed how fast these things come together. We are going for that perfect melt and a little bit of crisp on the top bun, so pay attention to the timing—it’s what makes these Italian Grinder Sliders shine!
First things first: turn that oven on! Get it preheated to 350 degrees F. We want everything nice and warm when these go in. You’ll take that whole package of slider rolls and, holding them together, slice them right in half horizontally. Don’t separate them yet! Lay that bottom half down in your 9×13 baking dish. Think of it as building a delicious, carb-based foundation!
Assembling the Deli Meat Sliders Layers
Now we stack up those layers of flavor. Remember, keep those rolls connected so you can easily slice them later. Start by layering the meats evenly across all the rolls on the bottom. Ham goes down first, followed by the salami, and top that with the pepperoni. We want great coverage, so don’t be shy!
Right on top of all that glorious meat goes your provolone. Seeing those slices of Provolone Cheese Sliders laid out makes me hungry already. Once the cheese is covering everything, we move to the top half of the rolls.
Baking and Applying the Glaze
While the bottom half is ready to go, the top half needs a little love before it gets married to the cheese. In a small bowl, you’ll whip up that simple glaze—it’s just melted butter, minced garlic, and part of that Italian seasoning. Brush this garlic butter mixture generously all over the top side of the rolls. Then, gently place that glazed top onto the cheese layer.
Time for the oven! Cover that entire dish tightly with aluminum foil. This steams everything just enough to get the cheese softening up and the flavors melding. Bake it covered for exactly 15 minutes. Set a timer—you don’t want to burn the bread!
When that timer goes off, take the foil off! We need the heat to hit the top now. Let it bake uncovered for just another 5 to 7 minutes, or until you see that top bun getting beautifully golden brown. The cheese should be totally gooey by this point.

Creating and Adding the Grinder Salad Sliders Topping
This step is crucial because we are aiming for that authentic grinder experience, which means crunch! You want to mix up your grinder salad while the sandwiches are in their second baking phase. In a separate bowl, whisk together the mayo, olive oil, red wine vinegar, the remainder of your Italian seasoning, salt, and pepper. This is your dressing’s base!
Once the dressing is smooth, fold in the fresh stuff: the shredded lettuce, the thin red onions, and those yummy pepperoncini peppers. Don’t forget that tiny splash of pepperoncini juice—it really boosts the tang!
Now for the magic moment: Pull the hot, cheesy sliders out of the oven. Carefully lift that top layer of rolls off. Spoon that fresh, tangy grinder salad mixture evenly over the melted cheese layer. It’s okay if it looks like a lot; trust me, it balances everything out. Pop the top rolls back on, slice them apart, and serve these Flavor Packed Sliders right away!
If you are looking for more hands-off, oven-based recipes, check out my method for easy baked chicken chimichangas. Totally different vibe, similar ease!
Tips for Success Making Your Grinder Sliders
You’ve got your meats layered and your glaze mixed, but I always have a few little secrets for making these the best grinder sliders around. When you’re making something like this—meant to be served hot, cheesy, and handheld—a few small adjustments can make a huge difference in the final texture. Since my goal here at MayaPlate is always practical perfection, listen up!
First, let’s talk bread, since we are using those sweet Hawaiian Rolls. They are amazing, but if you happen to be out of them or just prefer a slightly less sweet sandwich, you can use plain white slider buns. Just know that the sweetness of the Hawaiian variety really works to balance out the salt and vinegar from the Italian flavors. Don’t skip that sweet/savory contrast!
Remember that tip I mentioned earlier? If you want to kick the flavor up a notch before you layer the meat, give the bottom halves of the rolls a very thin smear of Dijon mustard. It’s not in the main recipe because I know not everyone loves that extra mustard zing, but for me, it’s essential for that authentic deli taste.
The biggest game-changer, though, is dealing with the grinder salad topping. This is a hot sandwich with a cold, fresh topping, and those two elements fight each other if you aren’t careful. If you want the absolute crispiest, freshest topping, only apply the salad mixture *after* the sandwiches come out of the oven. If you bake the lettuce and onion in there, they just get sad and wilted.

The recipe notes mentioned you can assemble these ahead of time, which is clutch for party planning, but if you assemble everything—including the salad—and refrigerate it, you need to account for the chill. When baking straight from the fridge, you’ll need to add about 5 to 10 minutes to that initial covered baking time. The cheese needs extra time to get gooey when it starts cold!
When you’re ready to serve a truly impressive starter, remember that sometimes the simplest additions make the biggest impact. If you’re looking for a companion dip, you have to try my recipe for the best crab dip—it’s another amazing, low-effort party favorite!
Make-Ahead & Freezer Tips for Pull Apart Italian Sandwiches
One thing I always hear when people love these grinder sliders is, “Can I make these before the party starts?” Absolutely! Planning ahead is the secret weapon of a relaxed host, and these sandwiches are perfect for that. Remember, our philosophy here is Genuinely Practical, so making things easier on you is always my goal!
For refrigeration—say, if you’re hosting friends tomorrow—you can assemble everything right up until the baking step. That means slicing the rolls, layering all your ham, salami, pepperoni, and that beautiful provolone cheese. Put the foil on tightly and tuck the whole dish into the fridge. Just remember the thermal adjustment I mentioned: when you pull them out cold, you need to add about 5 to 10 minutes to that covered baking time to let the cheese really melt through.
Now, let’s talk freezing, because who doesn’t love having hot, cheesy sandwiches ready to go for a random weeknight? My advice for the best result is to freeze them *before* you bake them and *before* you add any of that beautiful fresh grinder salad topping.
- Assemble the layers exactly as you would for refrigeration: bottom rolls, meats, cheese, and the glazed top rolls.
- Wrap the entire dish securely in a double layer of plastic wrap, followed by a layer of heavy-duty aluminum foil. This prevents freezer burn, which is the enemy of a good slider!
- You can freeze assembled Pull Apart Italian Sandwiches like this for up to one month.
- When ready to cook, let the dish thaw in the refrigerator overnight. Then, remove the plastic wrap, recover with foil, and bake as directed, adding that 5-10 minute extension to the covered baking time.
Don’t even think about freezing them after they’ve been baked—reheated baked sliders never have that same magic crumb. Trust me on freezing them raw! If you are looking for more make-ahead recipes that bring comfort without the fuss, you absolutely have to try my easy pumpkin bread recipe; it freezes like a dream.
Serving Suggestions for Your Cheesy Baked Sandwiches
Now that you have a pan full of these gorgeous, savory, hot Cheesy Baked Sandwiches, you might be wondering, “What goes best with them?” Since these sliders are incredibly rich, packed with meat, cheese, and that tangy grinder salad underneath, you want sides that offer a nice contrast—something light, crunchy, or something extra for dipping!
If these are the main event for a game day spread, you don’t want heavier sides getting in the way. I always opt for things that cut through the richness without requiring extra cooking time. Nobody wants to tend a deep fryer during a party!
- The Perfect Crunch Companion: Since we already have lettuce and onion in the topping, you don’t need another heavy salad. Instead, grab some sturdy, thick-cut potato chips—especially plain or slightly salted flavors work best so they don’t clash with the Italian seasoning.
- Something Green and Zesty: If you want another salad on the table, go for something bright! Think about a simple marinated cucumber salad or maybe my favorite creamy broccoli salad, but skip the heavier bacon for this pairing so the main star stays the sliders! The vinegar and fresh crunch are fantastic next to the melted provolone.
- Dipping Sauce Alert: Yes, I said dipping sauce! While these are perfect on their own, having a small bowl of warm marinara sauce on the side for dipping is just classic Italian-American comfort food. It sounds strange, but dipping a hot, cheesy Italian slider into warm marinara? It’s next level!
- Veggie Sticks for Balance: Carrot sticks and celery are always good for guests looking for something light. They offer a cool crunch that feels refreshing between those warm, savory bites.
Honestly, if these grinder sliders are fresh out of the oven, they don’t need much company at all. They really are a complete, happy little meal all on their own!
Storage and Reheating Instructions for Leftover Grinder Sliders
Nobody likes leftovers going to waste, especially when they taste this good! The great news is that these grinder sliders keep pretty well, but you need a little strategy depending on how you assembled them. This is all about preserving that meltiness and keeping the bread from getting totally soggy—my main goal when reheating anything cheesy and baked!
First, let’s talk about the messy part: the grinder salad topping. If you added that fresh slaw mixture *before* you baked them (which I generally advise against, see earlier tips!), the lettuce and mayo dressing will definitely wilt and make the bread soft overnight. You can still eat them, of course, but they will be much more like a standard hot deli sandwich than a crispy-topped slider.
Storing Sliders Baked *Without* the Salad Topping: If you were smart and only baked the meat and cheese and then sliced them, store them in an airtight container in the fridge for up to three days. They will still be fantastic!
Reheating is Where the Magic Happens: You *must* avoid the microwave for reheating these cheesy baked sandwiches if you want any texture left in that bread. The microwave just steams everything and guarantees a floppy outcome.
Instead, grab a regular baking sheet. Preheat your oven to 350 degrees F. Lay the leftover grinder sliders out in a single layer (if you can manage to keep them together, great, otherwise just space them out). Bake them uncovered for about 8 to 10 minutes. This warms the meat through, re-melts that provolone into gooey perfection, and helps crisp up the exterior of the bread again. That little bit of oven time makes all the difference!
If you need a super quick side dish idea once you reheat your leftovers, my recipe for steakhouse-style creamed spinach is surprisingly fast and pairs really well with Italian flavors!
If you added the salad topping before baking and they are soggy—don’t worry! Reheat them the same way in the oven, but know that the texture won’t recover much. For those leftovers, maybe serve them pressed down with a side of chips for dipping, or just accept they are now warm, soft Italian sandwiches and enjoy them for what they are!
Frequently Asked Questions About Grinder Sliders
I know you might have a few burning questions about perfecting your grinder sliders, especially if you are planning for a big gathering! Over the years, I’ve gotten plenty of questions about making sure these turn out party-perfect every time. Here are the ones I hear most often from readers looking to master these Flavor Packed Sliders.
Can I substitute the Hawaiian Rolls for other bread when making these Easy Baked Sliders?
That’s a great question! You totally can, but I highly recommend sticking with the sweet slider rolls if you can find them. The magic of these particular Easy Baked Sliders comes from the sweet roll balancing out all that salty, vinegary Italian goodness. If you use plain white slider buns, they will still be delicious, but you’ll lose that little bit of caramelized sweetness on the crust that makes the flavor pop so much!
What is the best way to keep these Crowd Pleasing Party Food sliders from getting soggy?
Okay, this is my number one tip for these types of sandwiches! The enemy of the tasty, melty bottom bun is moisture from the topping. If you add the fresh grinder salad topping (lettuce, mayo mix) *before* you bake them, the bread will get totally soft and soggy when it cools. For the best texture, treat that slaw like a fresh garnish. Bake the meat and cheese until they are super gooey, and then slice and spoon the salad mixture on right before serving. If you have to prep ahead, put the salad mixture in a bowl next to the hot sliders—that’s the secret to keeping them crispy!
Are these Miniature Italian Hoagies suitable for freezing?
Yes, they certainly are! This actually works perfectly if you’re planning ahead for an event. You can assemble the entire sandwich—bottom roll, meats, cheese, and the glazed top roll—wrap the whole tray tightly in plastic wrap and foil, and freeze them unbaked. They are perfect for pulling out the night before a big game day so they can thaw in the fridge. Just remember what I said earlier: always add an extra 5 to 10 minutes to the covered baking time when cooking from cold!
If you’ve got leftovers after the party and need some quick meal inspiration for the week, take a look at my guide on quick, healthy lunch ideas!
Nutritional Estimate for Flavor Packed Sliders
I always like to give an estimate of what you’re taking in when you indulge in one of these amazing Flavor Packed Sliders, especially since we focus on intelligent nutrition here at MayaPlate. Keep in mind that because of the cured meats and the cheese, the sodium content is definitely higher, but the protein payoff is excellent!
This estimate is based on serving size being exactly one of the 12 grinder sliders, and it doesn’t include any optional additions like Dijon mustard or side dipping sauces.
- Calories: About 350 per slider
- Protein: A hefty 18 grams—that adds up quickly!
- Total Fat: Around 20 grams
- Carbohydrates: About 22 grams (thanks to those slightly sweet rolls)
These are just estimates, but they let you know these are definitely hearty enough for a meal, not just a light snack! If you are looking for more substantial yet simple meals for busy days, check out my guide to simple weeknight dinners.
PrintFlavor-Packed Italian Grinder Sliders

Make these easy baked Italian grinder sliders using sweet Hawaiian rolls, savory deli meats, and provolone cheese. They are perfect for parties, game days, or a quick family dinner.
- Prep Time: 15 min
- Cook Time: 20 min
- Total Time: 35 min
- Yield: 12 servings 1x
- Category: Lunch
- Method: Baking
- Cuisine: American
- Diet: Vegetarian
Ingredients
- 1 (12 count) package sweet slider rolls (like Hawaiian rolls)
- 12 slices ham
- 12 slices salami
- 12 slices pepperoni
- 12–14 slices provolone cheese
- 1/2 cup mayonnaise
- 1 tablespoon olive oil
- 1 tablespoon red wine vinegar
- 2 teaspoons Italian seasoning, divided
- 1/2 teaspoon salt
- 1/4 teaspoon black pepper
- 1/4 cup shredded iceberg lettuce
- 1/4 cup thinly sliced red onion
- 1/4 cup sliced pepperoncini peppers
- 1 tablespoon pepperoncini juice
Instructions
- Preheat your oven to 350 degrees F. Slice the package of slider rolls in half horizontally, keeping the rolls connected. Place the bottom half of the rolls in a 9×13 inch baking dish.
- Layer the meats and cheese evenly over the bottom half of the rolls: place ham slices, then salami, then pepperoni, and finally the provolone cheese slices across the bread.
- In a small bowl, whisk together the melted butter, minced garlic, and 1 teaspoon of Italian seasoning to create the glaze. Brush this garlic butter mixture evenly over the top half of the rolls. Place the top half of the rolls onto the cheese layer.
- Cover the baking dish tightly with aluminum foil. Bake for 15 minutes.
- Remove the foil and bake for another 5 to 7 minutes, or until the cheese is fully melted and the tops are lightly golden brown.
- While the sliders bake, prepare the grinder salad topping. In a separate bowl, combine the mayonnaise, olive oil, red wine vinegar, remaining 1 teaspoon of Italian seasoning, salt, pepper, shredded lettuce, red onion, pepperoncini peppers, and pepperoncini juice. Mix well.
- Remove the baked sliders from the oven. Carefully lift the top layer of rolls and spoon the grinder salad mixture evenly over the melted cheese layer. Replace the top rolls.
- Slice the sliders apart between the rolls. Serve immediately as a crowd-pleasing party food.
Notes
- For extra flavor, you can add a light layer of Dijon mustard to the bottom rolls before adding the deli meats.
- If you do not have sweet rolls, use plain white slider buns, but the sweetness balances the savory meat well.
- You can assemble these cheesy baked sandwiches ahead of time and keep them covered in the refrigerator for up to 4 hours before baking. Add 5-10 minutes to the covered baking time if baking straight from the fridge.
Nutrition
- Serving Size: 1 slider
- Calories: 350
- Sugar: 5
- Sodium: 850
- Fat: 20
- Saturated Fat: 8
- Unsaturated Fat: 12
- Trans Fat: 0.5
- Carbohydrates: 22
- Fiber: 1
- Protein: 18
- Cholesterol: 45