
When summer hits, I completely lose my desire to stand near a hot oven, don’t you? We want those cool, refreshing treats that remind us of perfect ice cream parlor evenings! That’s exactly why I developed this phenomenal banana split cake recipe. It captures every single beloved flavor of the classic sundae—the creamy base, the tangy pineapple, the fresh fruit—but it does it all without turning on a single burner. As someone balancing a career and a focus on truly nourishing food, I absolutely need those simple indulgences. This layered dessert is the perfect ice cream cake alternative because it’s easy to assemble, tastes incredibly decadent, and needs nothing more than time in the fridge to set up perfectly.
- Why This No-Bake Banana Split Cake is Your New Summer Favorite
- Gathering Ingredients for Your Banana Split Cake Recipe
- Step-by-Step Instructions for the No Bake Banana Split Cake
- Expert Tips for the Perfect Banana Split Cake
- Storage and Reheating Instructions for Your Layered Dessert
- Frequently Asked Questions About the Banana Split Cake Recipe
- Nutritional Estimates for the Banana Split Cake
- Share Your Simple Party Dessert Creations
Why This No-Bake Banana Split Cake is Your New Summer Favorite
Listen, ditching the oven is the best part of summertime eating, right? This banana split cake truly shines because it maximizes flavor with minimal effort. It’s the ultimate easy layered dessert, and trust me, it’s already my go-to for every gathering.
- No Oven Required! We keep the kitchen cool; all the magic happens while chilling.
- It’s incredibly practical: Mix, layer, and chill—perfect for a potluck perfect dessert!
- The combination of creamy layers and fresh fruit means high reward for low active time.
We believe good food should fit your schedule. For more on how we balance deliciousness and practicality, check out our story here at MayaPlate.
Gathering Ingredients for Your Banana Split Cake Recipe
Okay, pulling together the components for this no-bake wonder is almost as much fun as eating it! Since this is a chilled dessert, the quality of your ingredients really pops through. I listed everything below, but I have one big plea for you right at the start: you absolutely must drain that crushed pineapple well. If you skip this step, your gorgeous graham cracker crust cake base is going to get soupy, and we can’t have that on our perfect banana split cake!
Crust Components
- 1 1/2 cups graham cracker crumbs
- 1/2 cup unsalted butter, melted
Creamy Filling and Pudding Base for the Banana Split Cake
- 1 (8 ounce) package cream cheese, softened
- 1 cup powdered sugar
- 1 (8 ounce) container frozen whipped topping, thawed, divided
- 1 (3.4 ounce) package instant vanilla pudding mix
- 1 1/2 cups cold milk
Fruit and Toppings for the Layered Dessert
- 3 ripe bananas, sliced
- 1 cup crushed pineapple, drained well
- 1 cup sliced strawberries
- 1/4 cup chocolate syrup
- 1/4 cup chopped nuts (optional)
- Maraschino cherries for topping (optional)
Step-by-Step Instructions for the No Bake Banana Split Cake
Don’t let the word ‘layered’ scare you! While we are building up structure here, the process is so intuitive, you’ll feel like you’re just stacking deliciousness. We move fast between steps so the layers stay cool and distinct, which is key for a stunning banana split cake presentation later on.
Creating the Graham Cracker Crust Cake Base
First things first, we build the foundation. Take your graham cracker crumbs and mix them right in a bowl with the melted butter until everything is evenly coated—it should look like wet sand. Press that mixture firmly into the bottom of your 9×13 inch pan. I always use the bottom of a measuring cup to really pack it down tight so we get that sturdy base. Then, pop it into the fridge to chill for about 15 minutes while you start the creamy filling.
Assembling the Cream Cheese and Pudding Layers
Next up, the creamy goodness! Beat your softened cream cheese and powdered sugar until they are perfectly smooth—no lumps allowed! Then, take maybe half of your thawed whipped topping and gently fold it into that cream cheese base. It’s important to fold lightly here so you keep all that lovely air in there. Spread this evenly over your chilled crust. For Step Three, whisk your instant vanilla pudding mix right into the cold milk. You mix until it starts to thicken up—that only takes about two minutes! Then, spread that pudding right over the cream cheese layer.
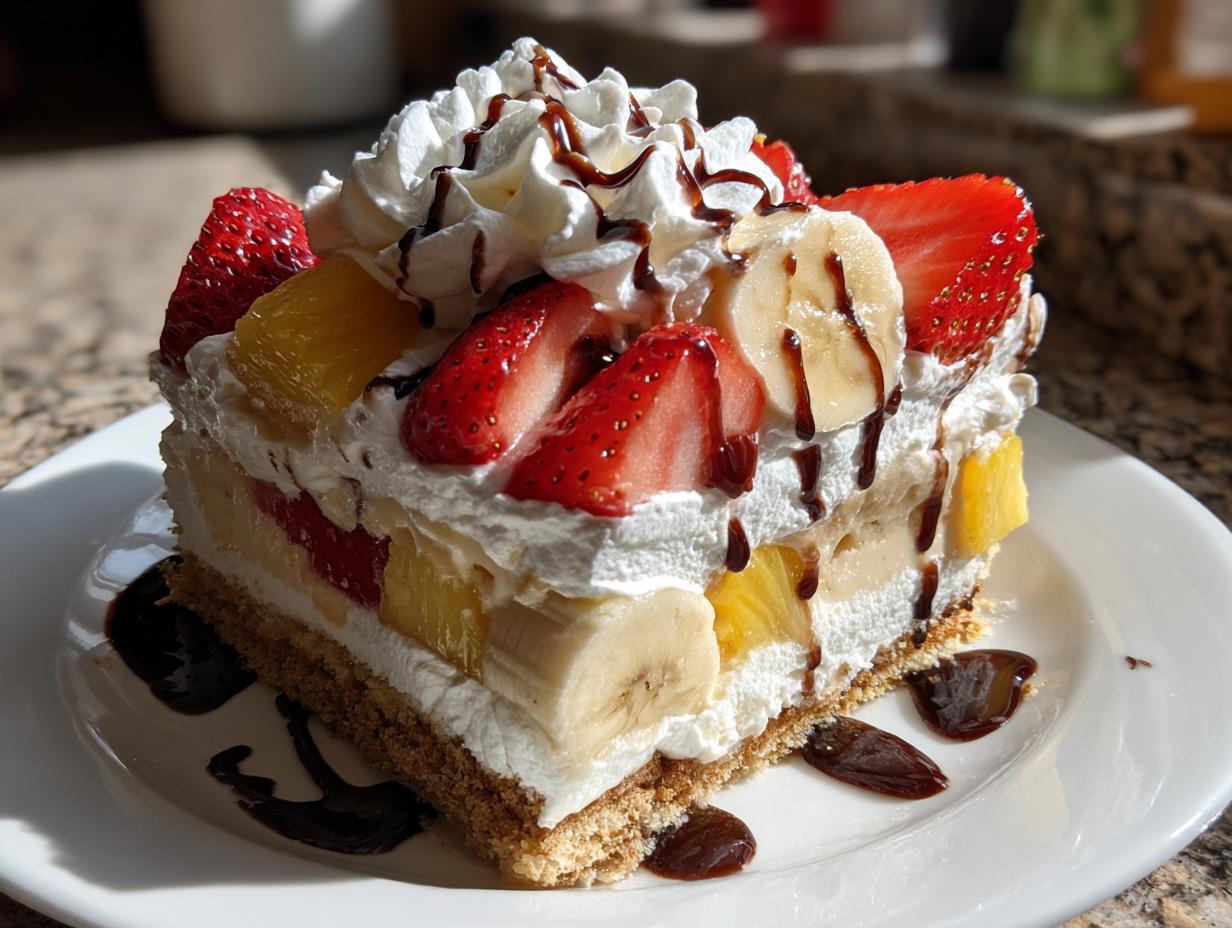
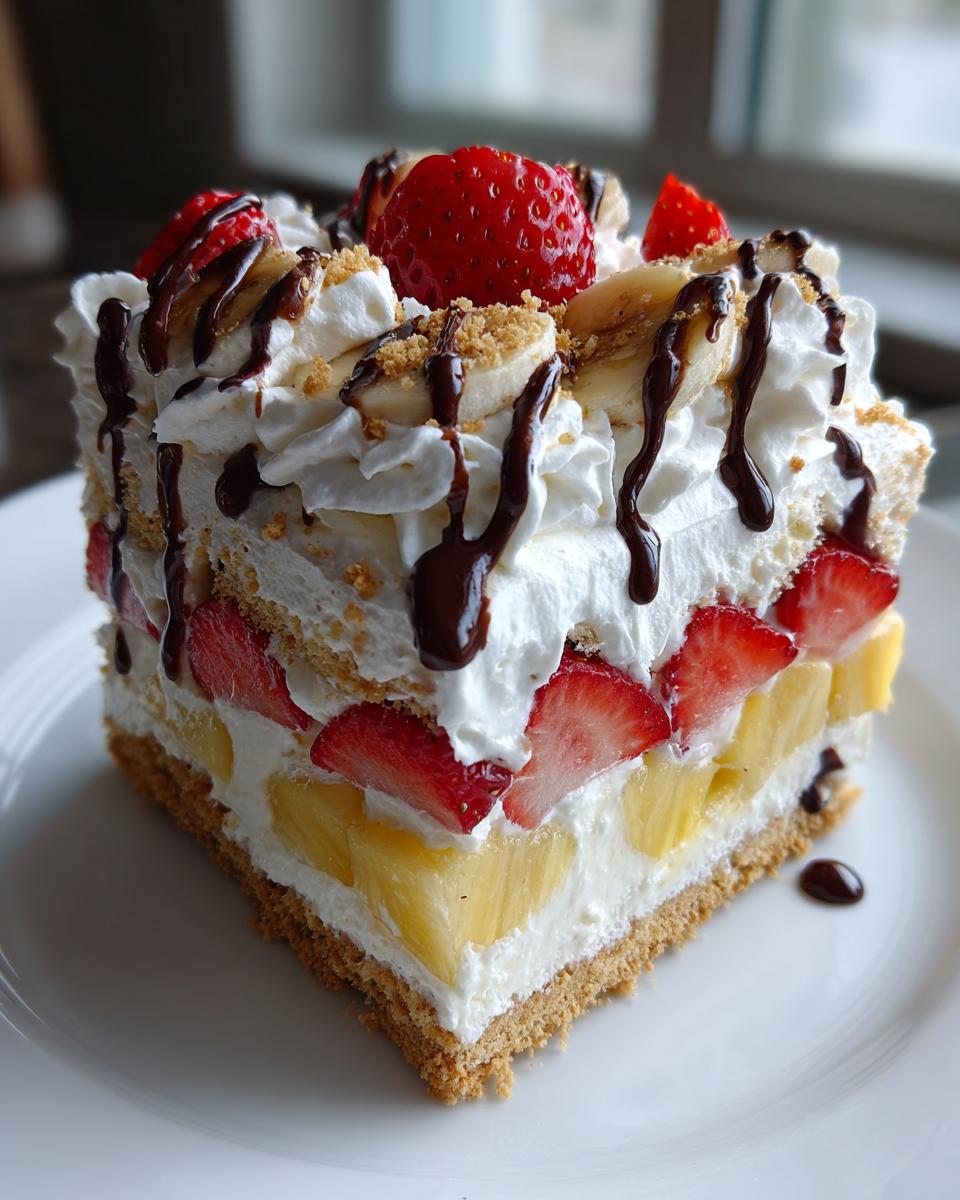
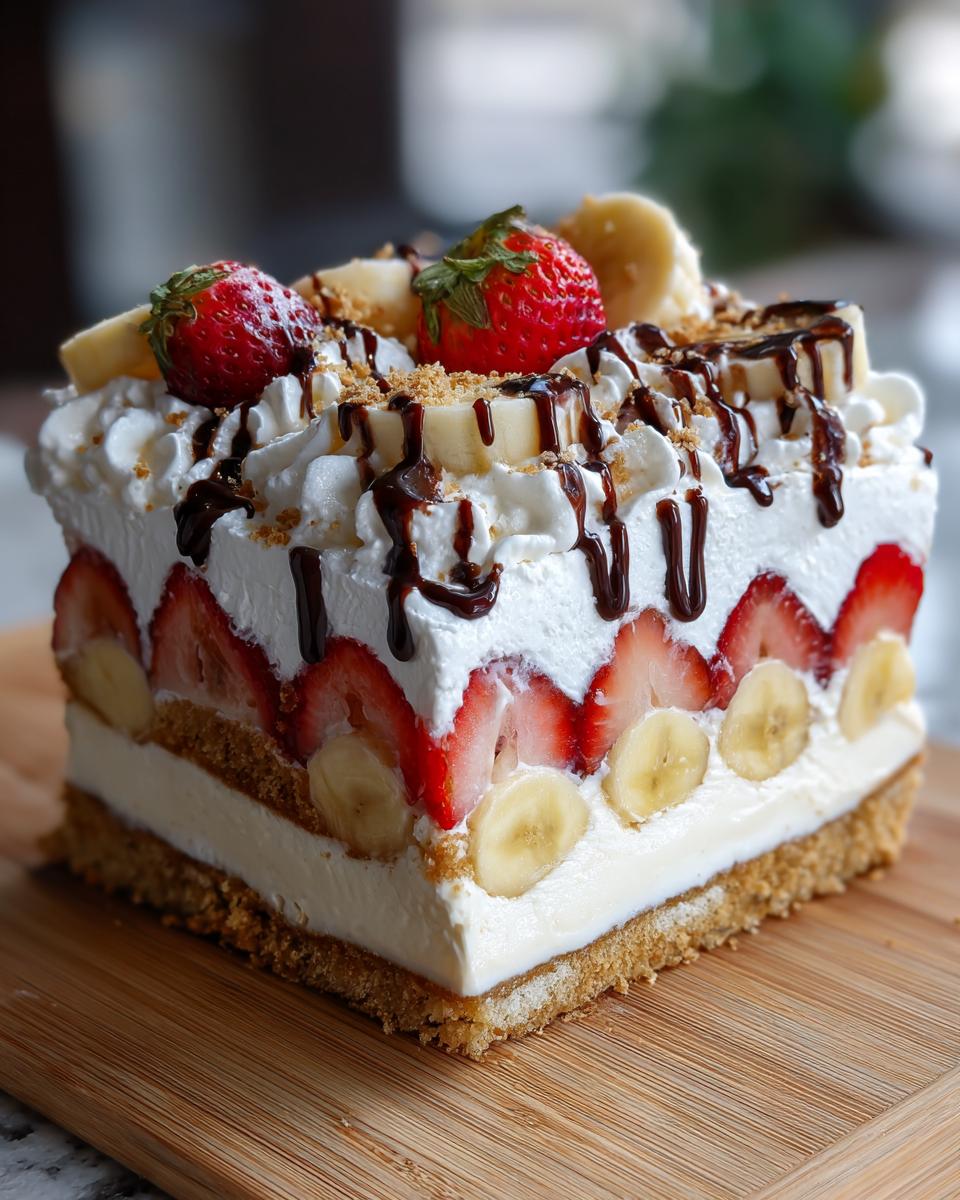
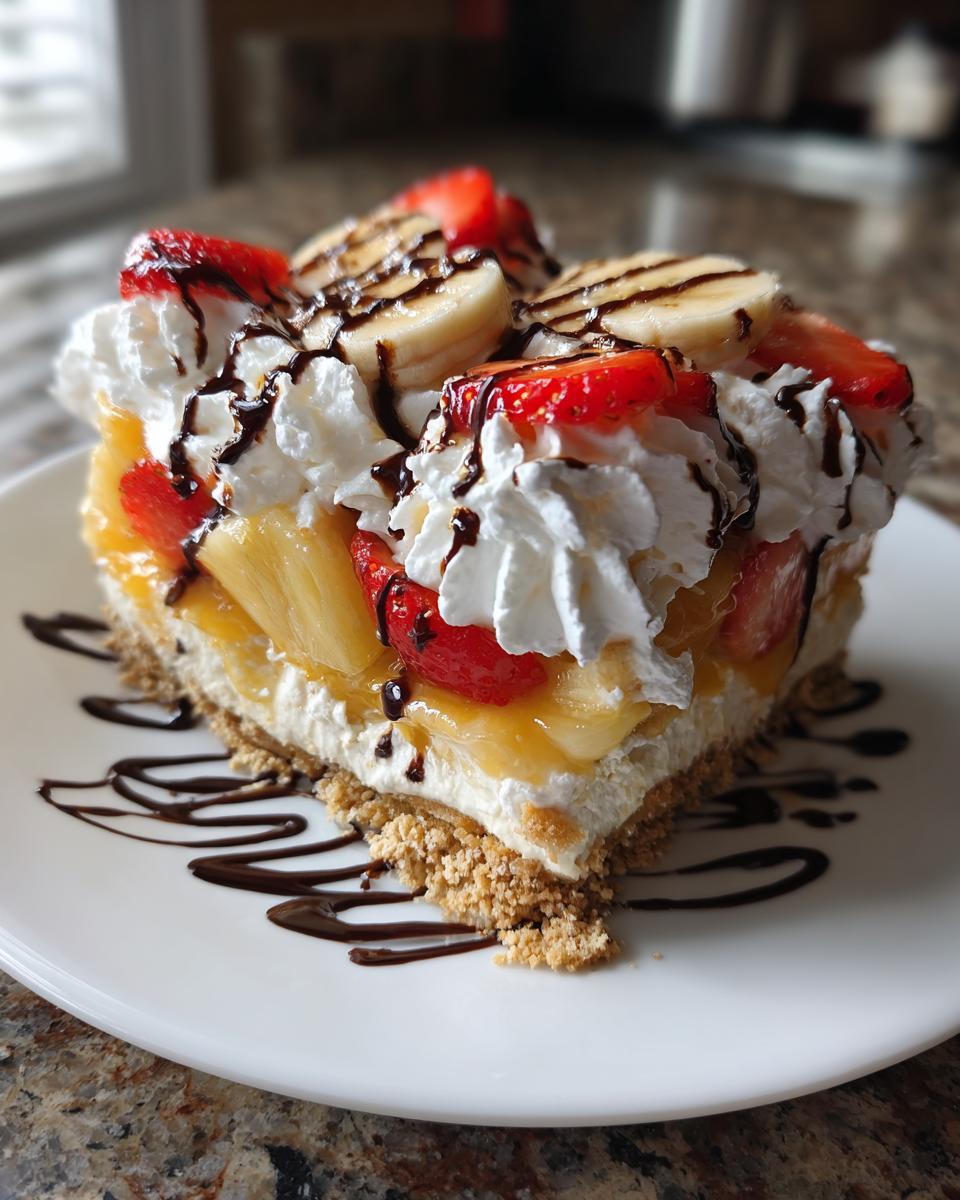
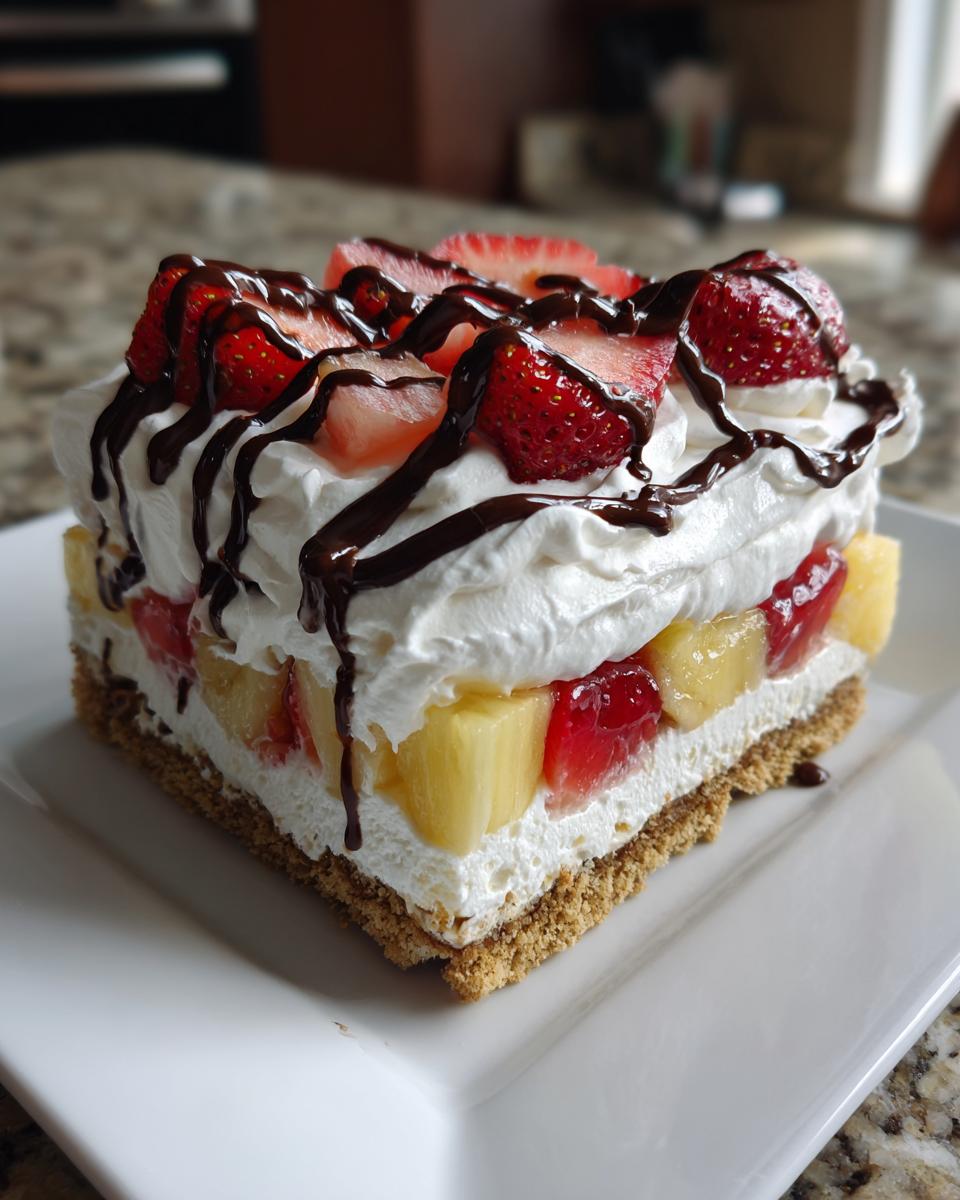
Layering Fruit and Final Chill for the Banana Split Cake
Now for the fun part that makes this a true banana split inspired treat! Arrange your sliced bananas over the pudding. Next, spread out your well-drained crushed pineapple and top that with your lovely sliced strawberries. Once the fruit is arranged, spread the remaining half of your whipped topping over the fruit—this seals everything in! Now comes the hardest part: covering the whole thing tightly and refrigerating it for a minimum of 4 hours. Seriously, let it set! This is how you guarantee this chilled no bake dessert slices perfectly clean.
Expert Tips for the Perfect Banana Split Cake
Because this is one of my favorite no oven dessert recipes, I’ve learned a few tricks to make sure it’s amazing when company comes over. We want this banana split cake to be sturdy, cold, and fruity—not a bowl of sweet soup! These little tweaks come from years of making this for family picnics.
Ingredient Clarity for a Great Banana Split Inspired Treat
That pineapple draining step I mentioned? It’s non-negotiable! Watery fruit ruins the texture. Also, use bananas that are ripe but still feel firm when you press them—overly soft ones turn to mush fast in the fridge. If you want a thicker, tangier base than the pudding mix provides, you can certainly use a no-bake cheesecake mix instead. It bumps up the richness nicely!
Achieving the Best Texture in Your Creamy Banana Dessert
When you’re mixing that cream cheese layer, make absolutely certain that cream cheese is completely soft. Beat it alone with the sugar until it’s silky smooth before you even think about folding in the whipped topping. If you have lumps there, they will stay there! Gentle folding is the key; treat that whipped topping like it’s made of spun sugar because we need to keep those air bubbles intact for a beautiful texture.
Storage and Reheating Instructions for Your Layered Dessert
Since this magnificent banana split cake is all about staying cool, we don’t even talk about reheating it—it’s meant to be served straight from the fridge! Keep your leftovers tightly covered in that 9×13 pan and pop them back in the cold right away. Covering it well is important so the whipped topping doesn’t absorb any fridge smells. This summer fruit cake stays wonderfully fresh for about three days, holding its layers together beautifully!
Frequently Asked Questions About the Banana Split Cake Recipe
I know when I try a new recipe, especially one that looks this fun, I always have a few lingering questions! It’s important to feel confident before you start layering this beauty. Getting the timing and texture right turns this from a good dessert into the absolute best summer treat. Feel free to check our privacy policy here if you’re curious about how we handle your information!
Can I make this banana split cake ahead of time?
Oh yes, you absolutely can! In fact, I highly encourage it since this is a chilled no bake dessert. You need that minimum 4-hour chill time anyway. I usually assemble the entire thing—crust, fillings, and fruit—the night before, setting it up to 24 hours in advance. The only thing I wait until just before serving to add are the final drizzles of chocolate syrup and the cherries. That keeps the chocolate looking super glossy and fresh on top of the whipped topping!
What is the best way to substitute the fruit in this easy layered dessert?
Bananas are tricky because they brown, no matter how careful you are! If you’re making this more than 6 hours ahead of time, I suggest skipping the banana layer entirely and focusing on the strawberries and pineapple. Or, if you must have them, slice the bananas and toss them lightly in a tiny bit of lemon juice before placing them on the pudding layer, then cover it quickly. You might sacrifice the ‘fresh banana’ look, but it’ll still taste amazing in this banana split cake!
Is this considered a no bake cheesecake banana split variation?
That’s a great question because people often look for that rich, airy texture! While we use instant vanilla pudding here to keep it incredibly light and fluffy, the foundation of the first layer is real cream cheese. So yes, you get that wonderful tangy, dense richness similar to what you find in a no bake cheesecake banana split, but with the lighter structure that comes from the whipped topping and pudding mix. It’s the best of both worlds!
Nutritional Estimates for the Banana Split Cake
Now, I know what you’re thinking—a rich, creamy, chocolate-drizzled, multi-layered dessert can’t possibly be that good for you! And you’d be right if you were eating the whole pan in one sitting! Since we are all focused on eating well while still enjoying life’s sweet moments, I wanted to give you a general idea of what one slice of this banana split cake looks like, nutritionally speaking. Remember, these figures are just estimates based on the ingredients listed, and they assume you get exactly 10 servings out of the 9×13 pan. Cooking is about balance, and this easy layered dessert definitely fits into a balanced diet when shared!
To see a popular no-bake recipe inspiration, you can look up this fantastic banana split cake recipe someone else put together.
Here are the estimated stats based on one serving size:
- Serving Size: 1 slice
- Calories: 350
- Sugar: 30g
- Fat: 18g (with about 9g saturated fat)
- Carbohydrates: 45g
- Protein: 4g
- Cholesterol: 35mg
Share Your Simple Party Dessert Creations
I put my heart into making this banana split cake recipe practical and truly delicious, and now I really, really want to see yours!
When you give this easy layered dessert a try for your next cookout or family dinner, please hop back here and leave a star rating. Seriously, those ratings help so many other busy folks decide if this is the right simple party dessert for them. I just love reading your comments—tell me how the cream cheese layer set up or if you added extra chocolate drizzle!
If you snapped a gorgeous picture of your chilled creation sitting on the table—maybe waiting for guests at a gathering—tag us on social media! It makes my day to see MayaPlate recipes coming to life on your tables. We’re always looking for new ways to eat well and enjoy simple moments, so go ahead and try this one out soon!
If you have any last-minute questions after making it, feel free to reach out to us directly via our contact page. And if you loved this one, you absolutely have to check out another great take on the recipe here to compare notes!
PrintNo-Bake Banana Split Layered Cake

Make this easy, creamy No-Bake Banana Split Cake for your next gathering. This layered dessert captures all the classic ice cream sundae flavors using a graham cracker crust and fresh fruit, requiring no oven time.
- Prep Time: 25 min
- Cook Time: 0 min
- Total Time: 4 hr 25 min
- Yield: 10 servings 1x
- Category: Dessert
- Method: No Bake
- Cuisine: American
- Diet: Vegetarian
Ingredients
- 1 1/2 cups graham cracker crumbs
- 1/2 cup unsalted butter, melted
- 1 (8 ounce) package cream cheese, softened
- 1 cup powdered sugar
- 1 (8 ounce) container frozen whipped topping, thawed, divided
- 1 (3.4 ounce) package instant vanilla pudding mix
- 1 1/2 cups cold milk
- 3 ripe bananas, sliced
- 1 cup crushed pineapple, drained well
- 1 cup sliced strawberries
- 1/4 cup chocolate syrup
- 1/4 cup chopped nuts (optional)
- Maraschino cherries for topping (optional)
Instructions
- Prepare the crust: Mix graham cracker crumbs and melted butter. Press the mixture firmly into the bottom of a 9×13 inch pan. Chill for 15 minutes.
- Make the cream cheese layer: Beat the softened cream cheese and powdered sugar together until smooth. Gently fold in half of the thawed whipped topping. Spread this mixture evenly over the chilled crust.
- Prepare the pudding layer: Whisk the instant vanilla pudding mix and cold milk together until thickened, about 2 minutes. Spread the pudding over the cream cheese layer.
- Layer the fruit: Arrange the sliced bananas over the pudding layer. Top the bananas with the drained crushed pineapple and sliced strawberries.
- Top the cake: Spread the remaining half of the whipped topping over the fruit layer.
- Chill: Cover the cake and refrigerate for at least 4 hours, or until firm.
- Serve: Before serving, drizzle the top with chocolate syrup, sprinkle with chopped nuts if using, and garnish with maraschino cherries. Slice and serve this easy layered dessert cold.
Notes
- Drain the crushed pineapple very well to prevent the cake from becoming watery. Press it between paper towels if needed.
- For a firmer texture, you can use a no-bake cheesecake mix instead of the pudding mix.
- You can substitute any whipped topping with homemade stabilized whipped cream.
Nutrition
- Serving Size: 1 slice
- Calories: 350
- Sugar: 30
- Sodium: 250
- Fat: 18
- Saturated Fat: 9
- Unsaturated Fat: 9
- Trans Fat: 0
- Carbohydrates: 45
- Fiber: 2
- Protein: 4
- Cholesterol: 35